
Bookkeeping in QuickBooks Online: Complete Guide
Last updated: July 2026
Maybe you've just opened QuickBooks Online for the first time. Or maybe you've been using it for months and still aren't confident you're doing it right. Either way, connecting your bank account and letting transactions flow in isn't the same as completing your books. Every transaction still needs to be recorded accurately, reconciled and reviewed before you can trust the numbers.
If you’re completely new to the software, start with this guide to what QuickBooks is and how it works.
This guide walks through a complete bookkeeping workflow in QuickBooks Online, from setting up a new company to producing a Profit and Loss report and Balance Sheet. It's built as a repeatable system, one you can run every single month, whether you're a beginner, a small business owner, or a bookkeeper managing books for clients.
Disclosure: This post was created in partnership with Intuit and contains affiliate links. If you sign up through one of these links, I may earn a commission at no additional cost to you.
Watch the complete QuickBooks Online walkthrough
Prefer to follow along on screen? The video below walks through the same seven-step workflow using a fictional creative agency, so you can watch every transaction, reconciliation and report happen in real time.
James walks through the full bookkeeping cycle for Pallet Town Creative Co. in QuickBooks Online. From setup to a Profit and Loss report and Balance Sheet.
Your seven-step bookkeeping checklist
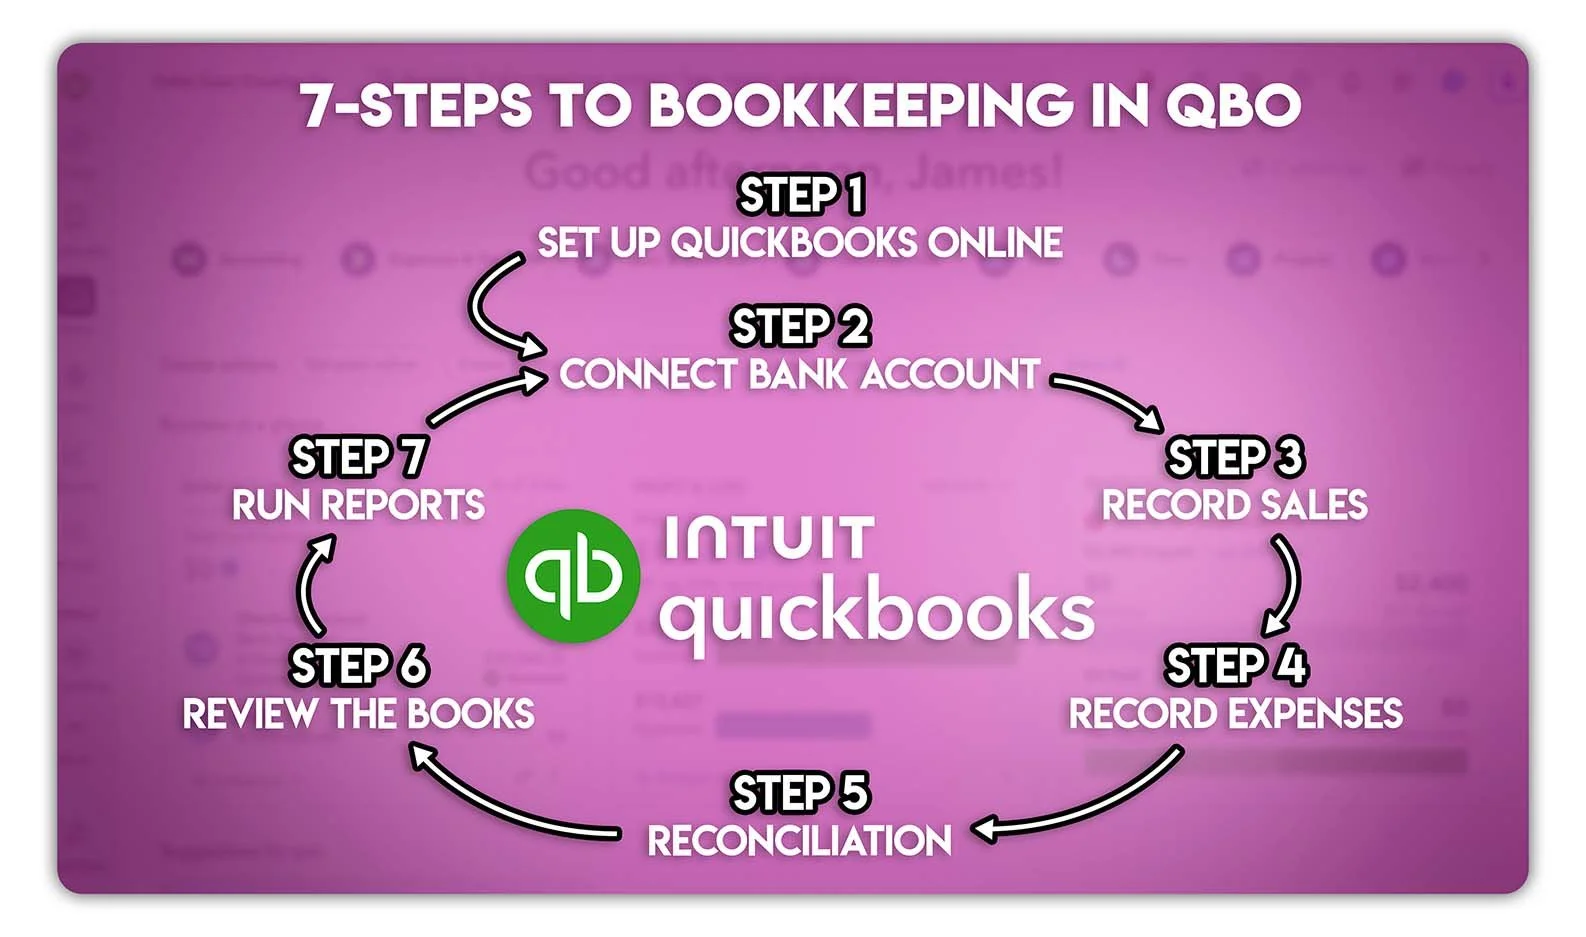
A seven-step bookkeeping workflow in QuickBooks Online covering setup, bank connections, sales, expenses, reconciliation, book review and financial reports.
Set up QuickBooks Online: choose a plan and configure your company
Connect your bank account: bring in transactions automatically or by manual upload
Record sales: invoice customers or log sales receipts
Record expenses: track bills and payments to suppliers
Review bank transactions and reconcile: match entries to your bank statement
Review the books: catch errors before you trust the numbers
Run financial reports: turn transactions into financial statements
Choose the right QuickBooks Online plan
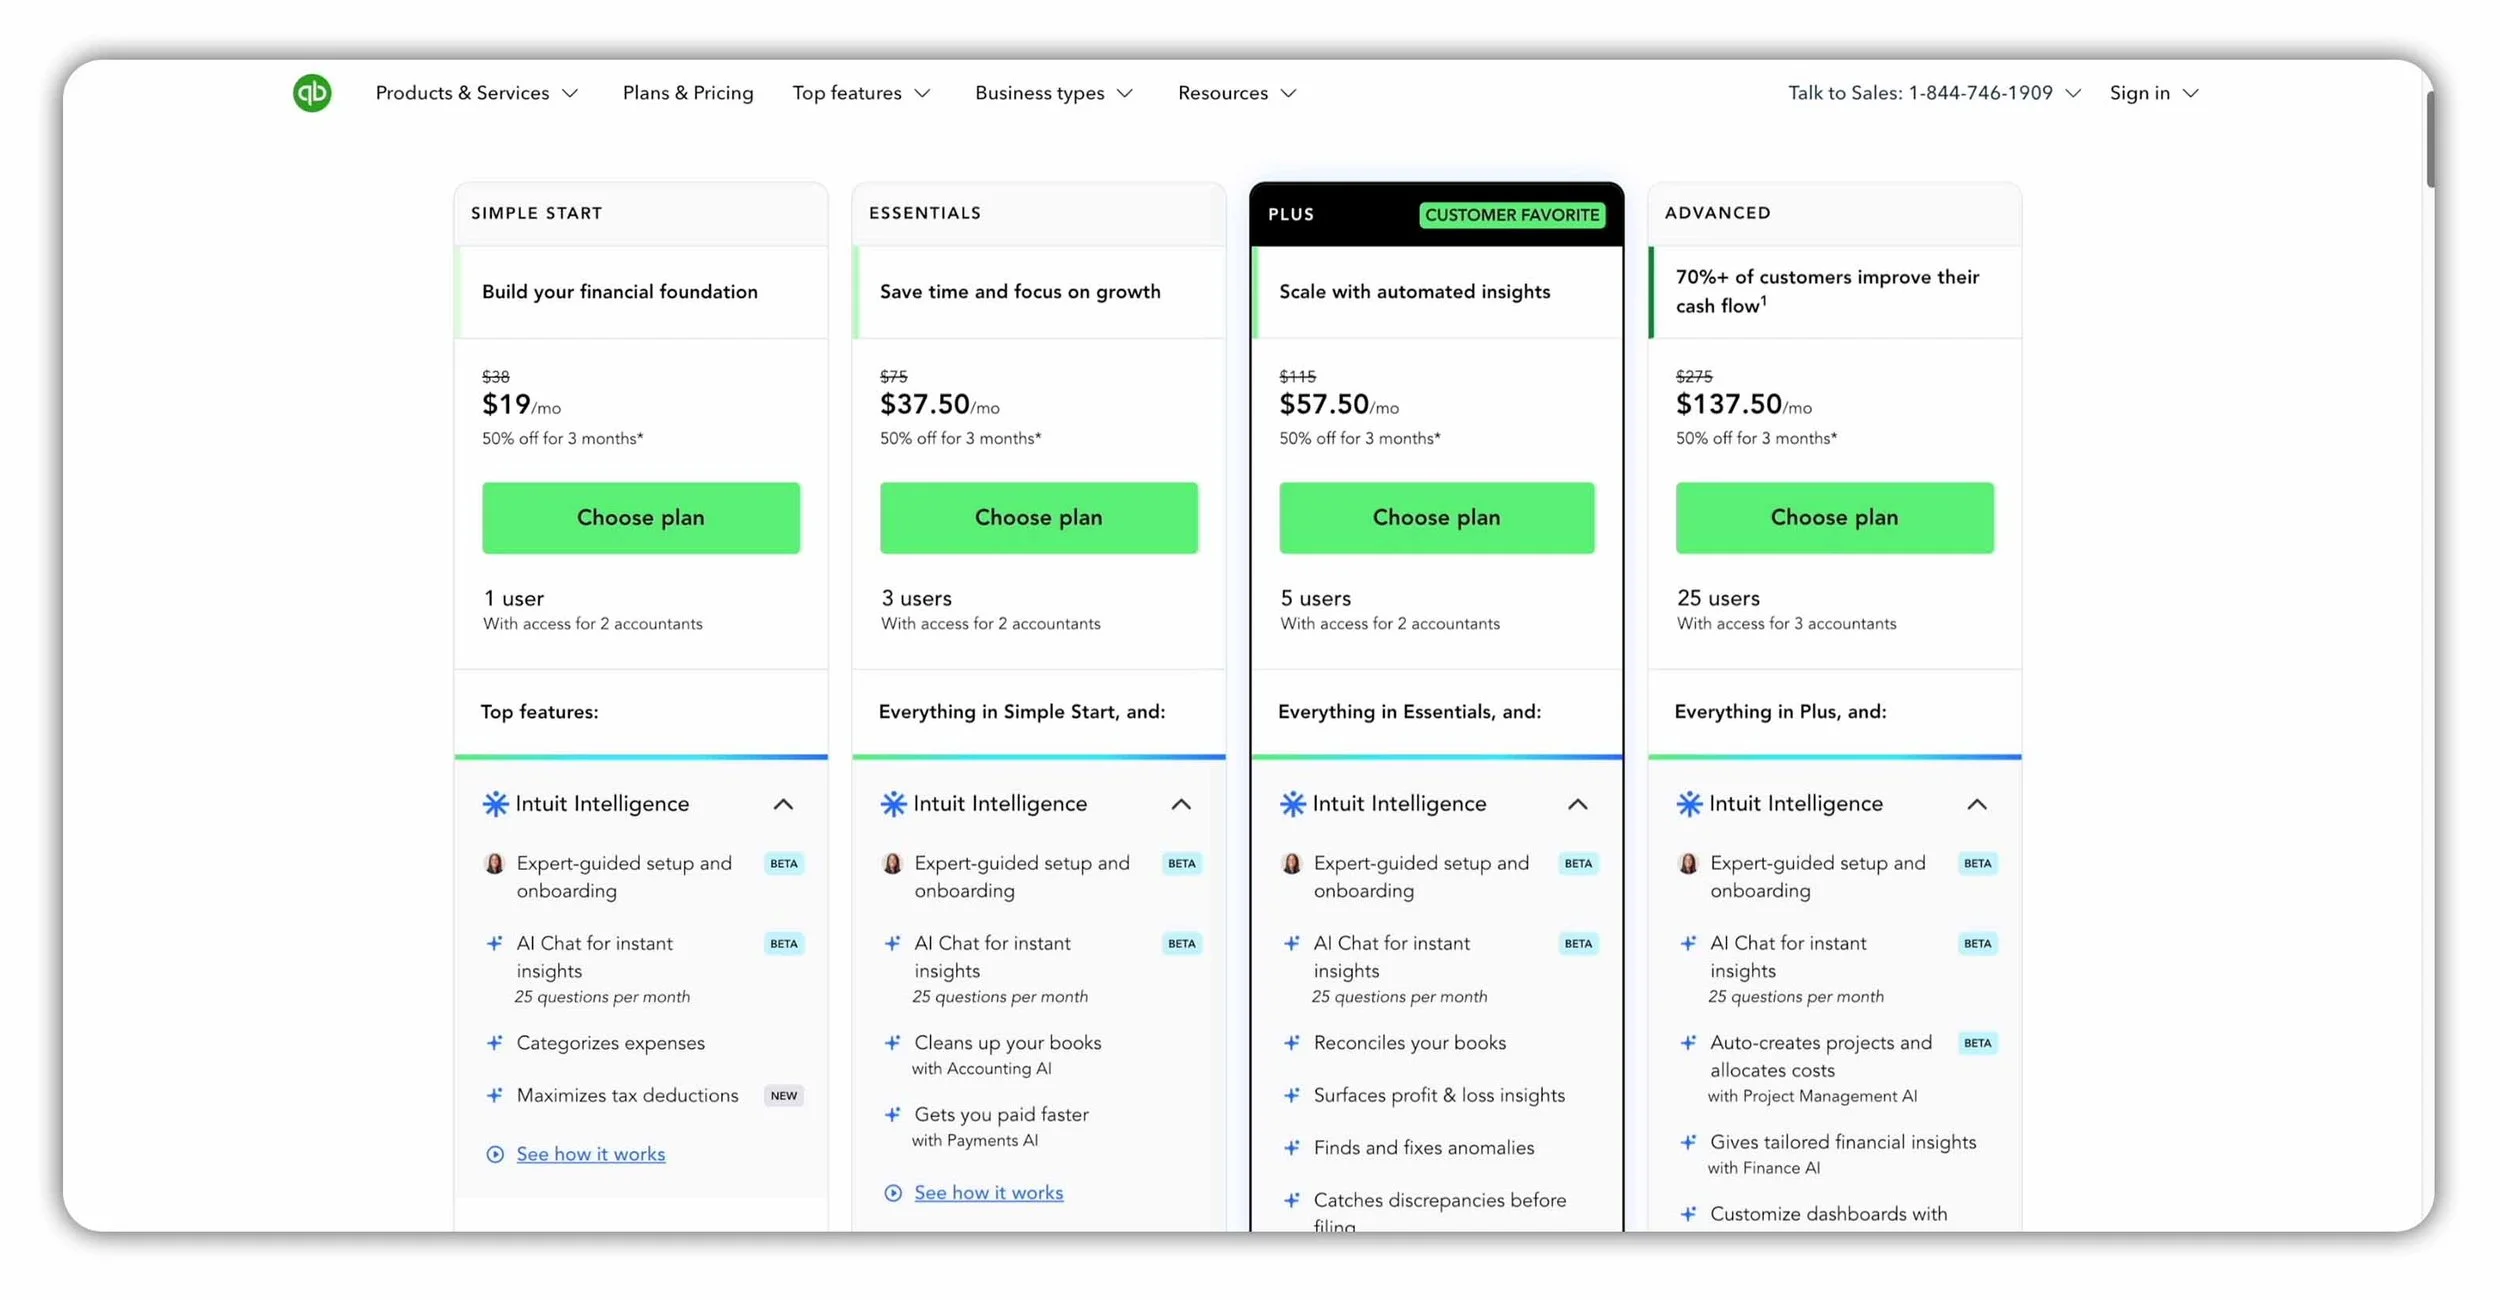
QuickBooks Online pricing table comparing the Simple Start, Essentials, Plus and Advanced plans.
Before setting up your business, you’ll need to choose the right QuickBooks Online plan that best fits your needs. There are four main options:
Simple Start: Best for freelancers, gig workers and solo operators who need the core bookkeeping features.
Essentials: Adds support for more users and tools suited to service-based businesses, including multiple currencies.
Plus: Includes five users, budgeting, project tracking, inventory tracking and additional AI-powered tools.
Advanced: Designed for larger businesses that need more users, tighter controls and advanced reporting capabilities.
For this walkthrough, we’ll use QuickBooks Online Plus because it includes the features needed to demonstrate the complete bookkeeping workflow.
Payroll is available as an optional add-on, but it isn’t required to follow this guide.
QuickBooks regularly changes its pricing and introductory offers, so check the current plans before signing up. You can view the latest options through my QuickBooks Online partner link.
Quick Tip: If you’re ready to commit to QuickBooks, a discounted subscription may offer better value than a free trial. Compare the current offers before choosing.
Get 50% off QuickBooks Online for 3 months
Click the link below to get 50% off your QuickBooks Online plan for your first three months:
Step 1: Set Up QuickBooks Online
Once you’ve selected a QuickBooks Online plan and entered your payment details, you’ll be taken through the setup wizard. The questions may vary slightly, but their purpose is the same: to help QuickBooks tailor your company file to your business.
You’ll be asked for information such as:
Your business name
What bookkeeping system you previously used
Your website, if you have one
Your industry and business structure
Your approximate annual revenue
Your role and team size
QuickBooks uses these details to customize your experience and recommend a suitable Chart of Accounts (the list of accounts used to organize your business transactions).
For this guide, we’ll set up a fictional marketing and creative agency called Pallet Town Creative Co.
Most of the setup questions are optional, so don’t worry if you don’t have every answer ready. The important thing is to create your company file and get started. You can update your business details later by selecting the Settings gear icon and going to Account and settings.
Explore the QuickBooks Online dashboard
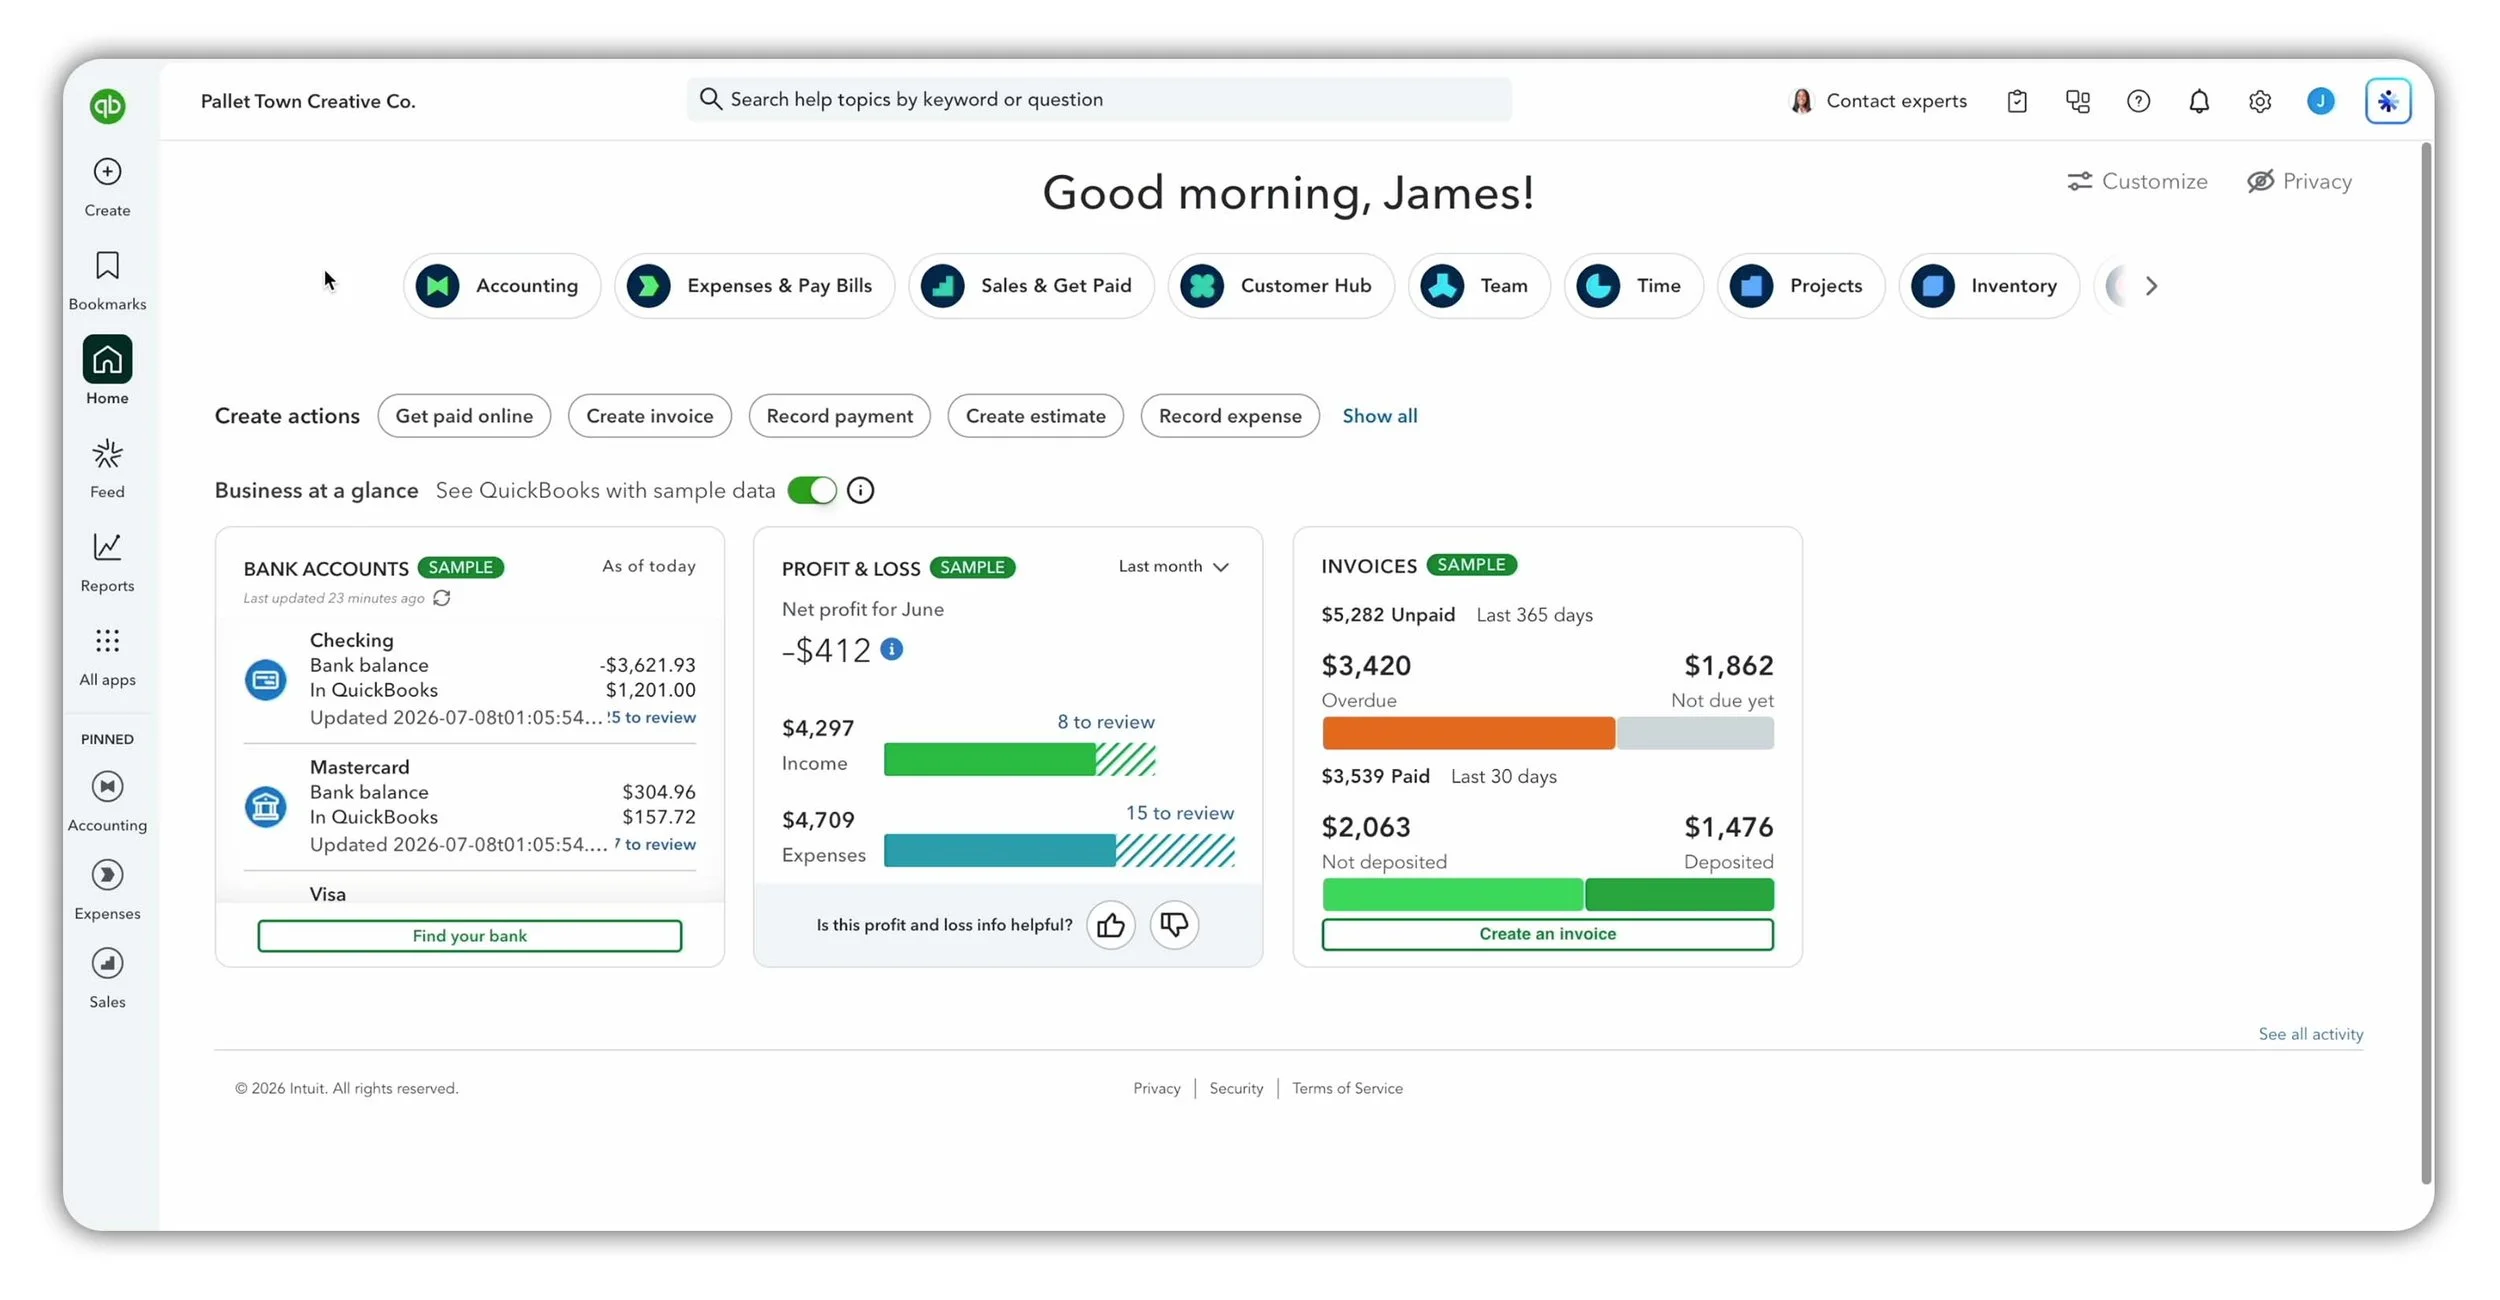
The QuickBooks Online dashboard provides shortcuts to key bookkeeping tools and summaries of bank accounts, profit and loss, invoices and other business activity.
Once setup is complete, you’ll arrive at the QuickBooks Online dashboard. This is the main screen you’ll see whenever you log in.
Here are the key areas to familiarize yourself with:
Create: Record new transactions such as invoices, expenses and bills.
Navigation bar: Access areas including Accounting, Expenses and Sales. Select Customize to add or remove shortcuts.
Smart search: Find transactions, customers, suppliers and reference numbers.
App carousel: Quickly navigate to different tools and features.
Dashboard widgets: View summaries of bank accounts, profit and loss, invoices and other important information.
Help and Settings: Find support, add your logo and update your company information.
QuickBooks may initially display sample data in its dashboard widgets to demonstrate how they work. You can turn this off once you’re ready to view your own business data.
You don’t need to learn every menu immediately. As you work through the remaining steps, you’ll return to each area when it becomes relevant.
Quick Tip: Take a few minutes to confirm your business name, contact details, financial year and accounting method under Account and settings. Getting these details right at the beginning can prevent confusion later.
Step 2: Connect Your Bank Account
Connecting your bank account allows QuickBooks Online to import transactions automatically, reducing the need to enter every sale and expense manually.
To get started, go to Accounting > Bank transactions. From here, you can either connect your bank directly or upload transactions manually.
Connect your bank automatically
Search for your bank and follow the secure sign-in process. QuickBooks will display the available checking, savings and credit card accounts, allowing you to choose which ones belong in your company file.
You may also be able to select how far back QuickBooks should import your transaction history. Once connected, new transactions will flow into the bank feed automatically.
Upload bank transactions manually
If your bank isn’t supported, or you prefer not to connect it, you can upload a transaction file instead:
Select Upload transactions.
Upload a supported file downloaded from your bank, such as a CSV.
Choose the QuickBooks account the transactions belong to, or create a new one.
Confirm the date format and map the transaction columns.
Review the preview and import the transactions.
Be careful when entering an opening balance. If your uploaded file already includes the transaction that introduced the starting cash, adding an opening balance as well could double-count it.
Categorize bank transactions
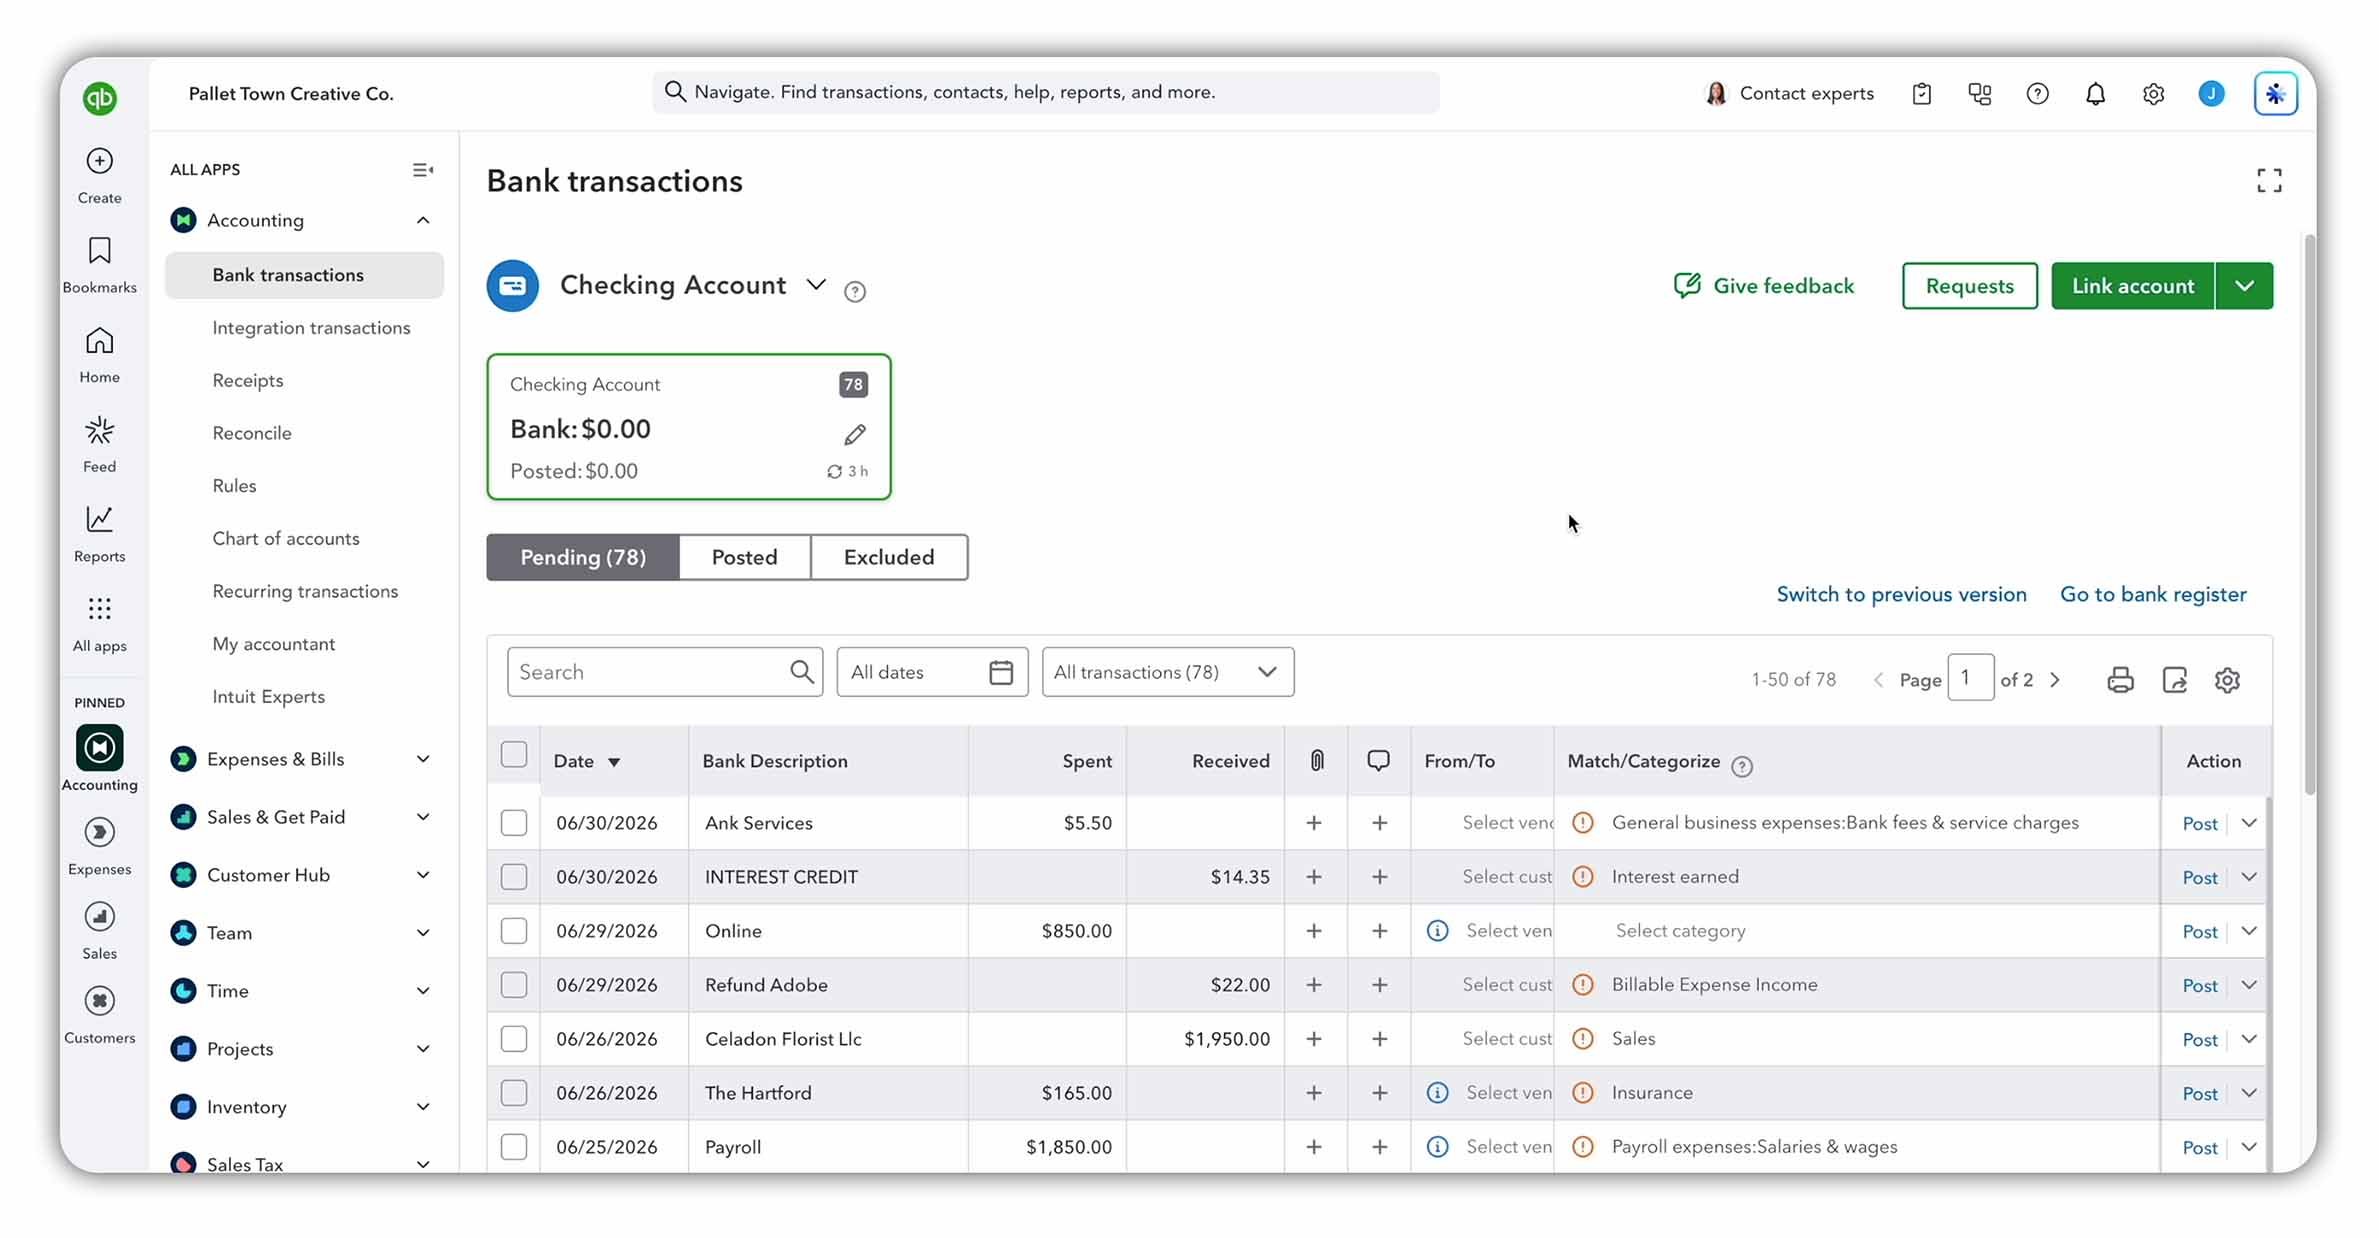
The Bank transactions page in QuickBooks Online, where imported transactions can be reviewed, matched to existing records or categorized and posted to the books.
Imported transactions do not affect your books until you review and accept them. QuickBooks may suggest vendors and categories based on the bank description, but you should confirm that each suggestion is correct.
For each transaction, choose between:
Match: Use this when the transaction has already been recorded in QuickBooks, such as an invoice payment or bill payment. Matching prevents it from being counted twice.
Categorize: Use this when the transaction has not been recorded yet. QuickBooks will create a new entry in your books.
You can also add the customer or vendor, adjust the category and attach supporting documents such as receipts, invoices or contracts.
QuickBooks can make the process faster by suggesting details and learning from recurring transactions, but human review still matters. Once every transaction has been reviewed and posted, your bank feed becomes a set of bookkeeping records that QuickBooks can use to prepare reports.
Step 3: Record Sales
There are two main ways to record sales in QuickBooks Online:
If the customer has already paid, categorize the payment from the bank feed or match it to an existing transaction.
If the customer will pay later, create and send an invoice in QuickBooks Online to record what they owe.
Create and send an invoice
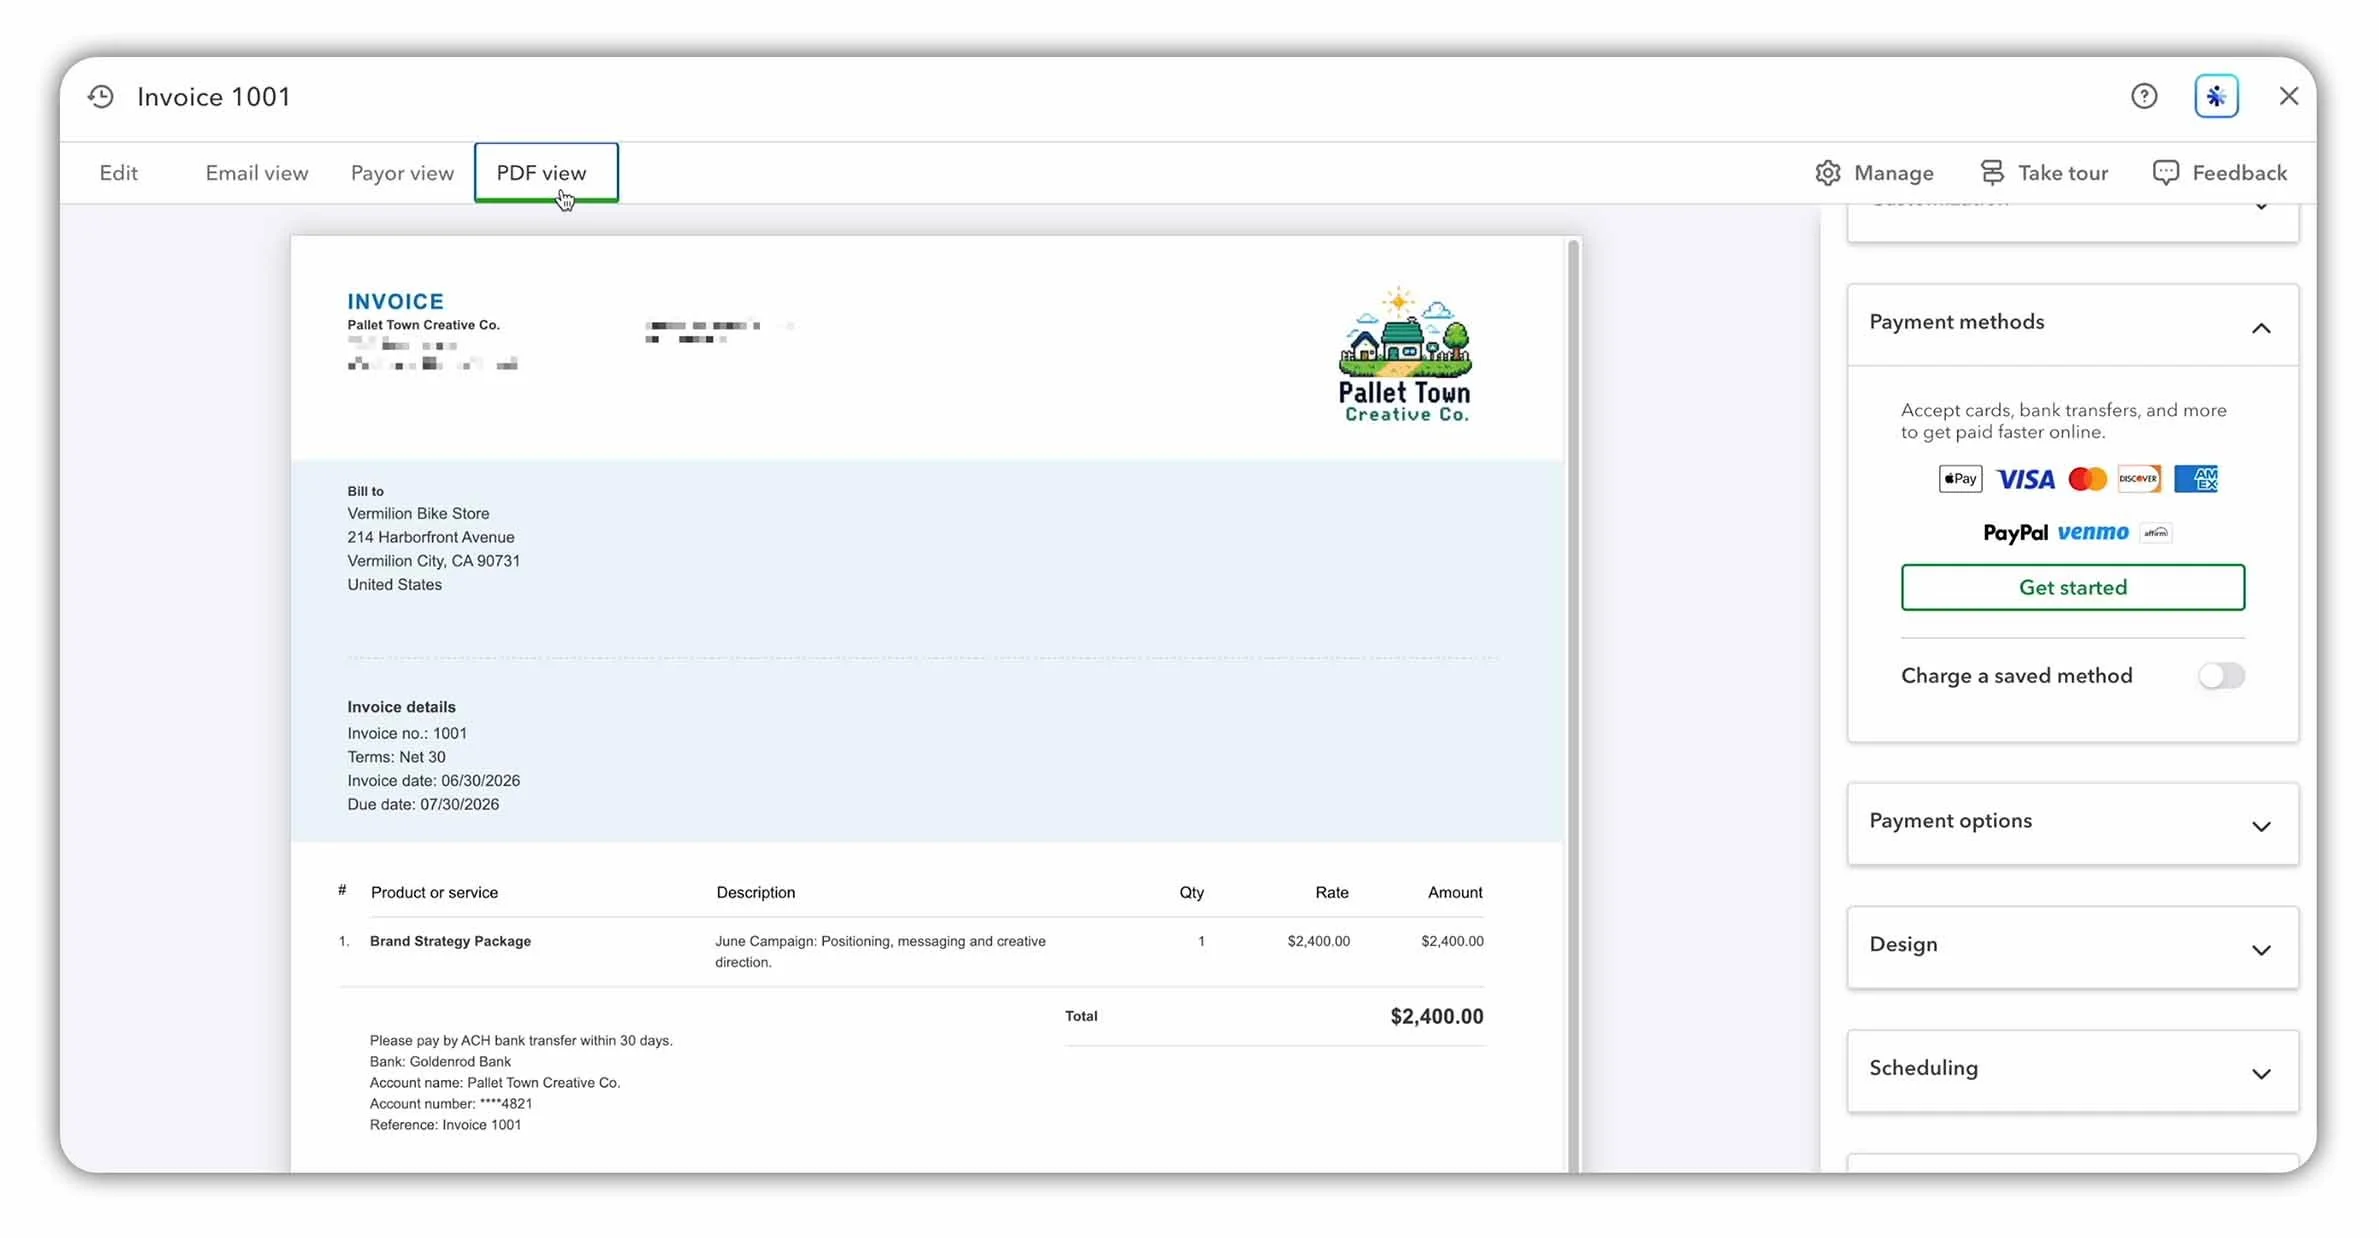
A completed customer invoice in QuickBooks Online showing the billing details, payment terms, services provided and payment instructions before the invoice is saved and sent.
Select Create > Invoice, then choose an existing customer or add a new one.
Next, enter the invoice details:
Confirm the invoice date, payment terms and due date.
Select the product or service provided.
Add a clear description, quantity and rate.
Apply sales tax if required.
Add payment instructions or enable online payment options.
Select PDF view to preview the finished invoice. Once everything looks correct, choose Save and send. QuickBooks will let you customize the accompanying email before sending it to the customer.
Track unpaid invoices
You can monitor outstanding invoices under Sales > Overview. An unpaid invoice forms part of your Accounts Receivable (money customers owe your business but haven’t paid yet).
If an invoice becomes overdue, select Send reminder. QuickBooks can use Intuit Intelligence to draft a polite payment reminder, which you can edit before sending.
Creating an invoice also updates your bookkeeping records. Under accrual accounting, it records Sales Revenue and Accounts Receivable immediately. When the customer pays, match the incoming bank transaction to the invoice to record the payment without counting the sale twice.
Step 4: Record Expenses
There are two main ways to record expenses in QuickBooks Online:
If you’ve already paid the supplier, categorize the payment from the bank feed or match it to an existing transaction.
If you receive a supplier invoice that you’ll pay later, enter it as a bill.
An Expense records a purchase that has already been paid. A Bill records an amount your business owes but hasn’t paid yet.
Enter a supplier bill
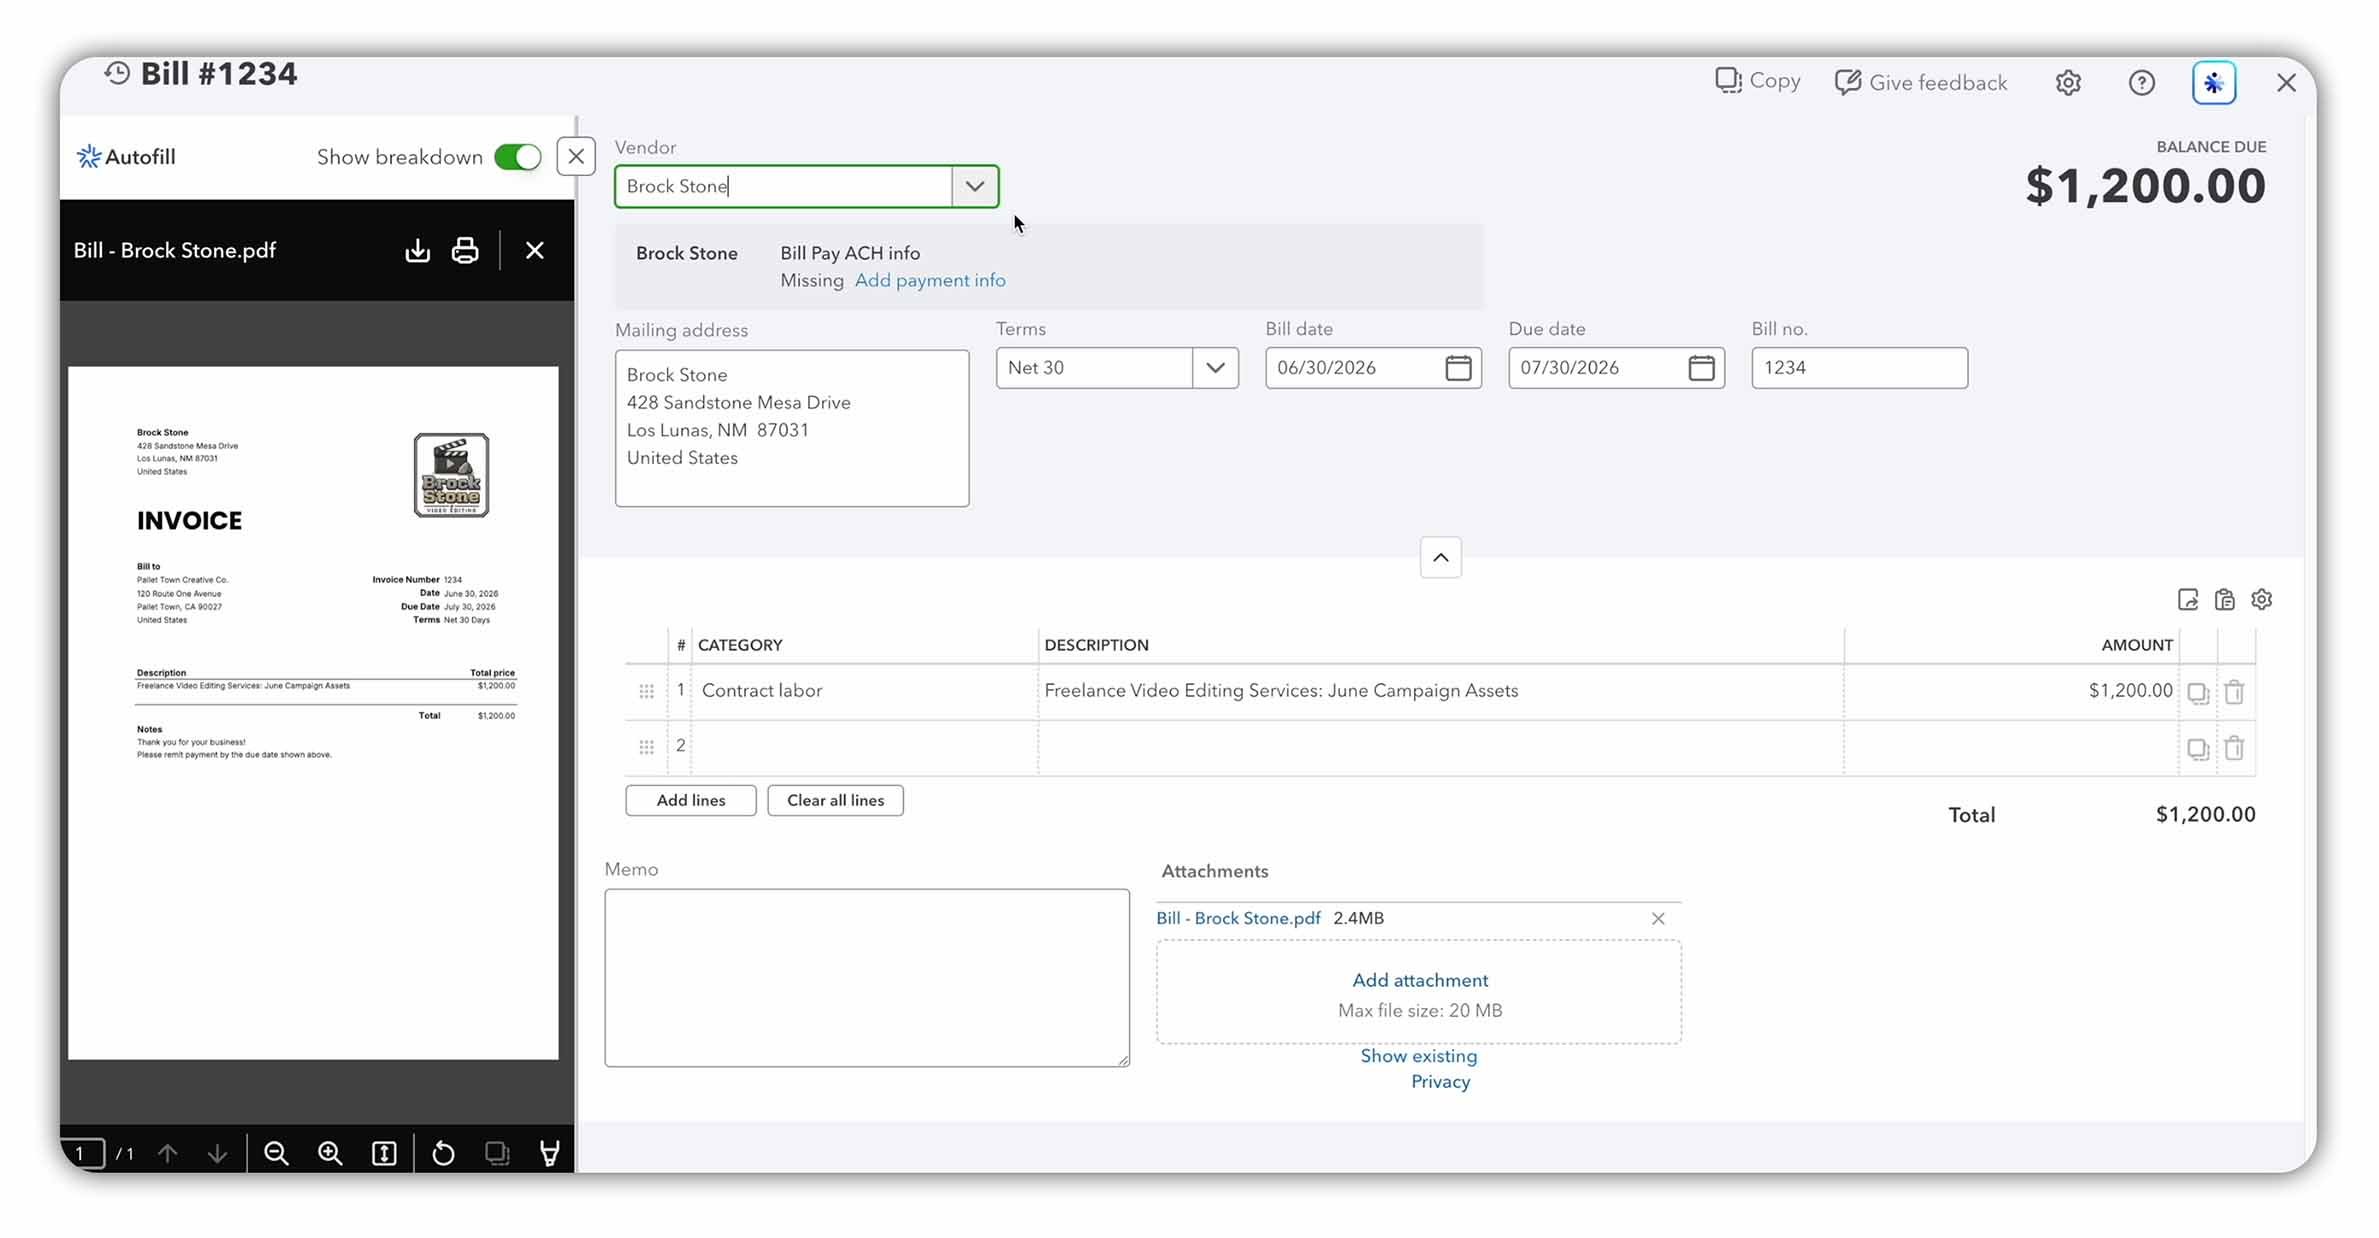
A supplier invoice uploaded to QuickBooks Online, with AI extracting the vendor, invoice number, payment terms, dates, description, amount and suggested expense category into the bill form.
Select Create > Bill. You can enter the details manually or upload the supplier invoice as a PDF or image. QuickBooks uses AI to extract information such as the supplier, invoice number, payment terms, dates, description and amount. It may also suggest an expense category and attach the original document to the bill.
Always review the extracted details and suggested category before saving. Once saved, the bill appears under Expenses > Overview and the amount is recorded in Accounts Payable (money the business owes its suppliers).
Pay and match the bill
You can schedule payment through QuickBooks Bill Pay, if available, or pay the supplier using your usual bank account or credit card.
When the payment appears in the bank feed, select Match to connect it to the existing bill. Don’t categorize it as a new expense, as this would record the same expense twice.
Matching the payment closes the bill and clears the corresponding Accounts Payable balance.
Step 5: Reconcile Your Bank Account
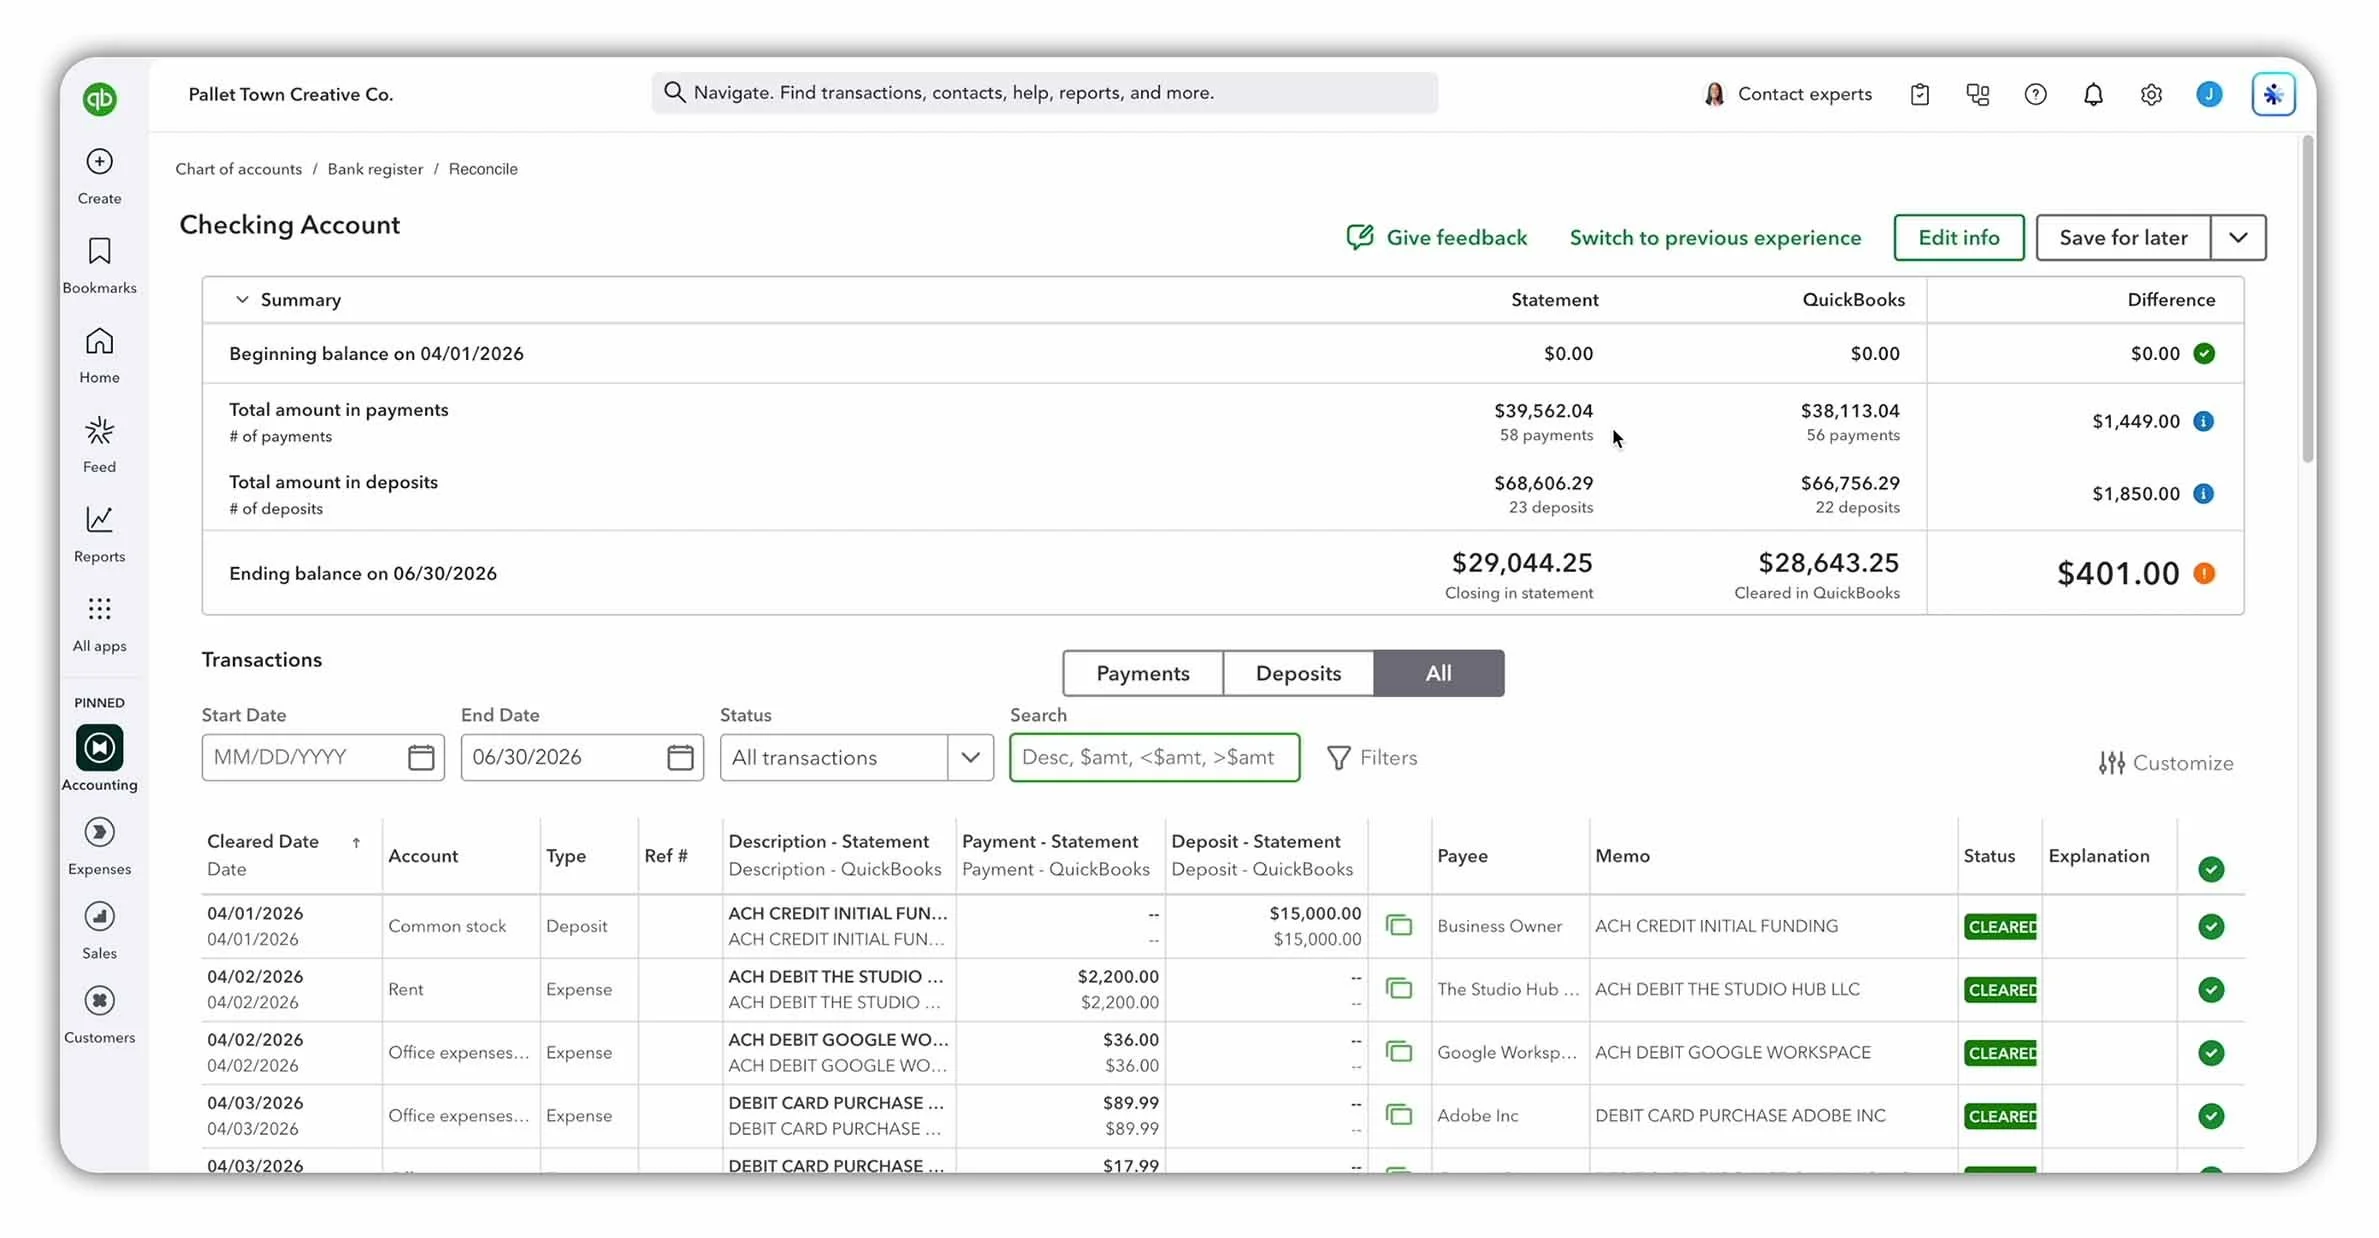
The bank reconciliation screen in QuickBooks Online compares payments and deposits on the bank statement with transactions recorded in QuickBooks, highlighting any difference that needs to be investigated.
Bank reconciliation compares the transactions recorded in QuickBooks Online with your real bank statement. This confirms that your books are complete and your bank balance is accurate.
Go to Accounting > Reconcile, select the bank account and enter the statement’s ending date and balance. You may also be able to upload the statement and let QuickBooks extract these details using AI.
Always check the extracted information against the original statement before selecting Start reconciling.
Investigate any difference
QuickBooks compares the payments and deposits in your books with those shown on the bank statement. If the difference isn’t zero, you’ll need to investigate before completing the reconciliation.
Reconciliation doesn’t just confirm your bank balance - it can also uncover missing, duplicated or unfinished transactions before they affect your financial reports.
Step 6: Review Your Bookkeeping
Even after you’ve recorded and reconciled your transactions, it’s important to review your bookkeeping before relying on the numbers.
A transaction could be miscategorized, an invoice might be overdue or a bill could be approaching its due date. A regular review helps you catch these issues before they affect your financial reports or cash flow.
Check for unfinished transactions
Start by opening Accounting > Bank transactions and checking the Pending tab. Review anything still waiting to be categorized or matched.
An empty Pending tab means every imported bank transaction has been processed, but it doesn’t necessarily mean every transaction has been recorded correctly.
Review outstanding invoices and bills
Next, check the money owed to and by your business:
Go to Sales > Overview to review unpaid and overdue customer invoices.
Go to Expenses & Bills > Overview to check unpaid supplier bills and upcoming due dates.
Follow up on overdue invoices and arrange payment for bills before they become late.
Investigate unusual activity
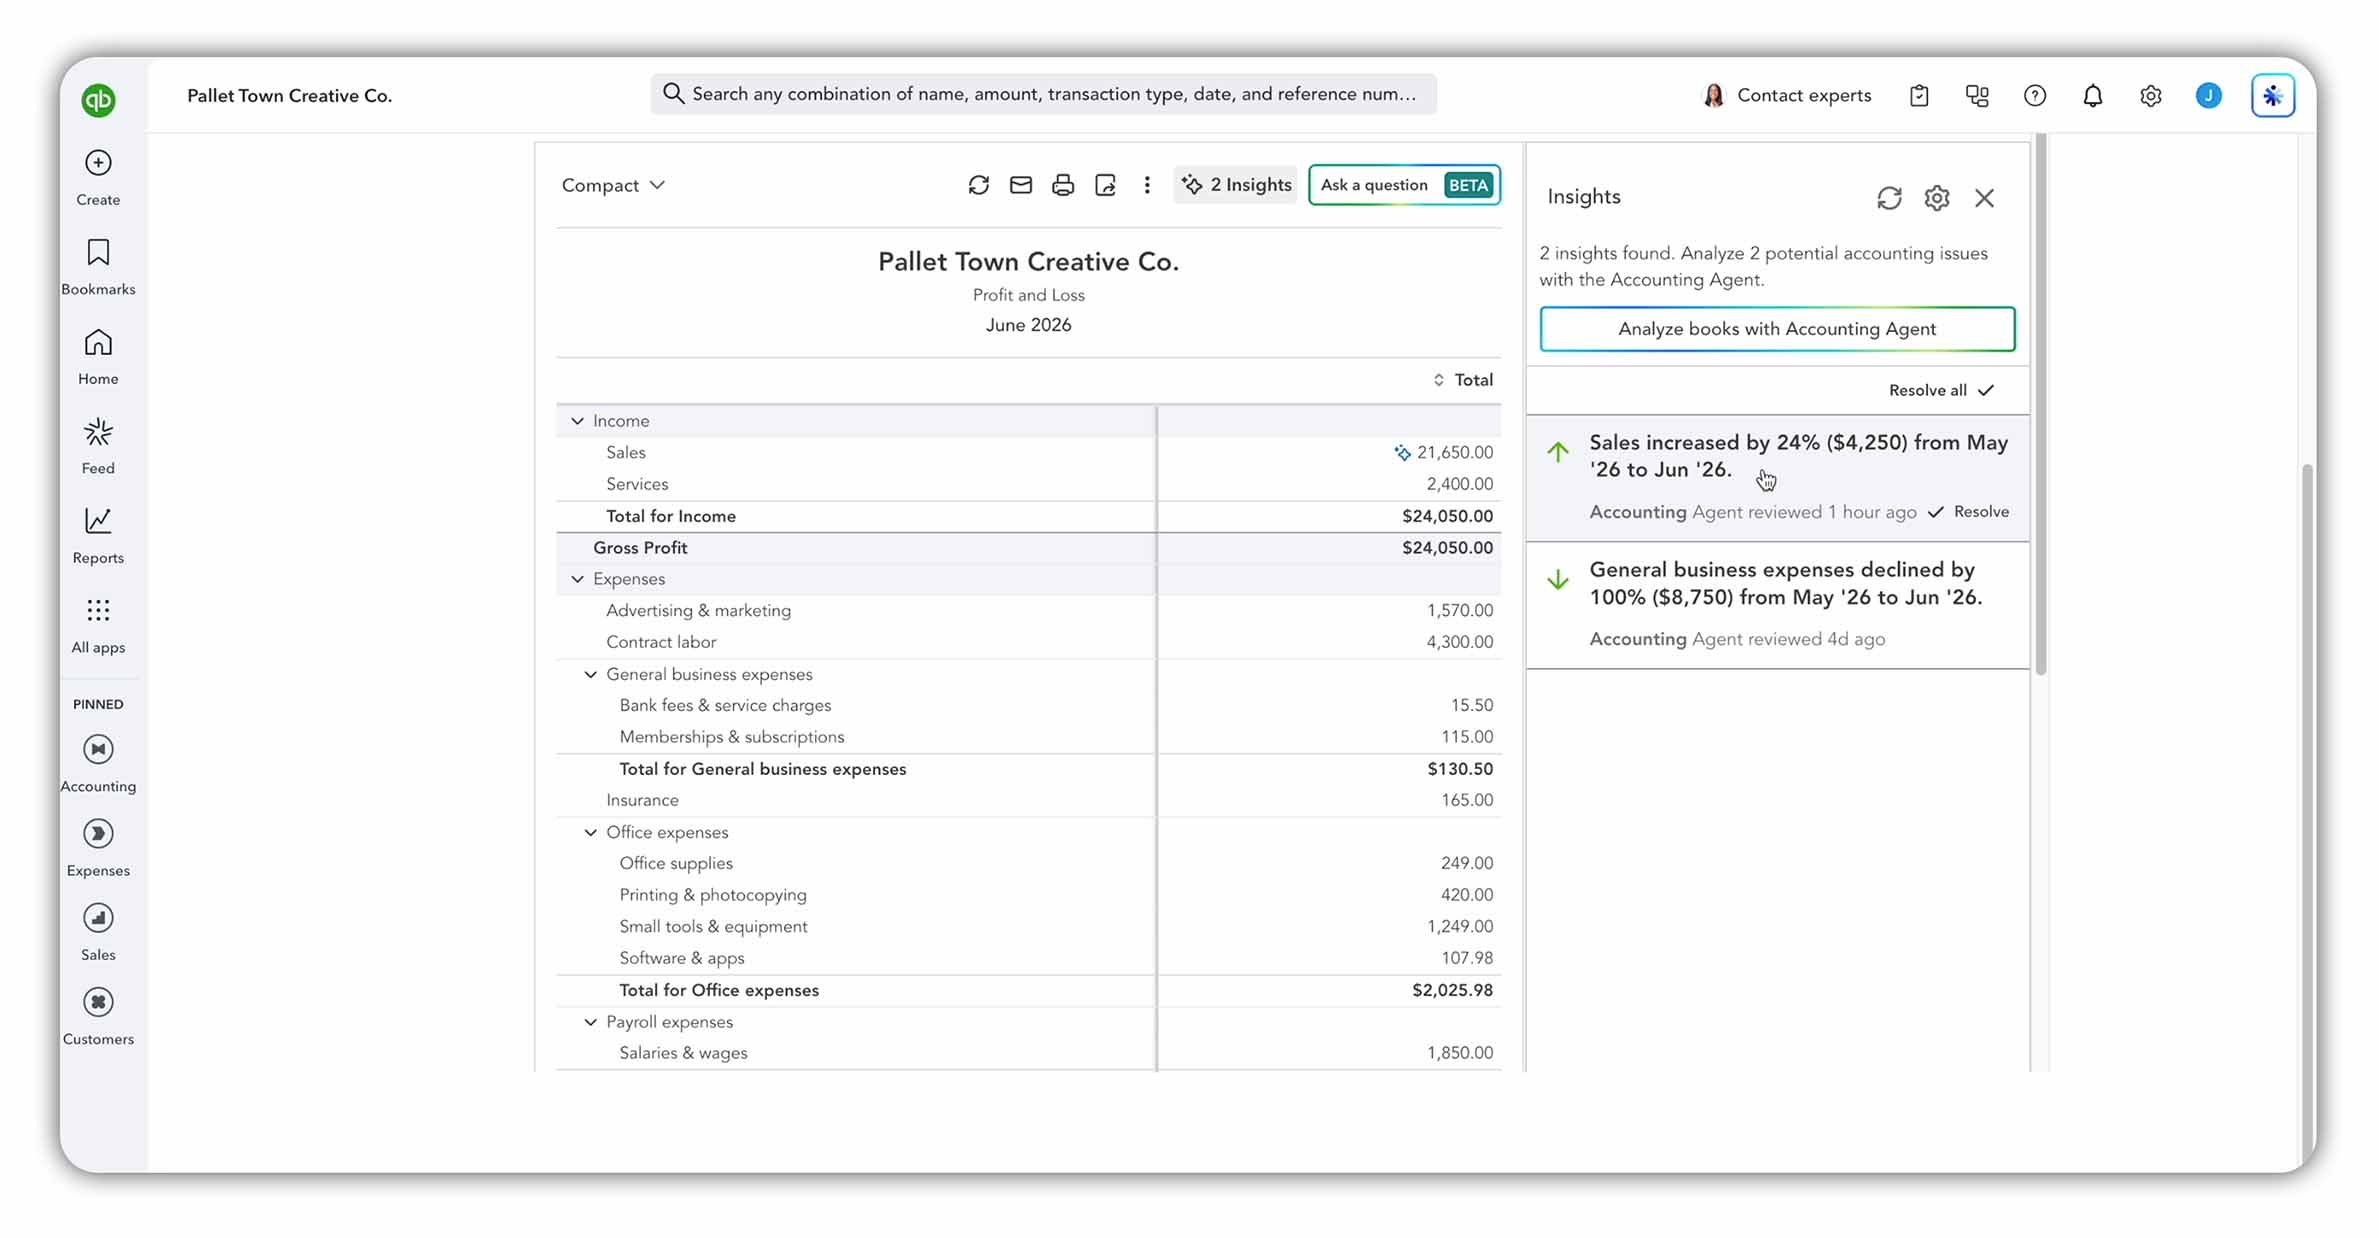
A Profit and Loss report in QuickBooks Online with accounting insights highlighting significant changes in sales and business expenses for review.
Finally, review your business performance and look for anything unexpected, such as:
Unusually large transactions
Sudden changes in income or expenses
Vague or incorrect account categories
Transactions recorded in the wrong accounting period
QuickBooks may use AI-powered insights to highlight unusual movements and help explain what caused them. These tools can point you in the right direction, but they can’t always determine the correct accounting treatment.
Open the underlying transactions, check any supporting documents and correct the records where necessary. QuickBooks can flag what looks unusual, but you still need to apply human judgment before trusting your reports.
Step 7: Run Financial Reports
Once your transactions have been recorded, reconciled and reviewed, QuickBooks Online can turn them into financial reports that show how your business is performing, what it owns and what it owes.
Go to Reports > Standard reports to access the full report library. The most important reports include:
Profit and Loss
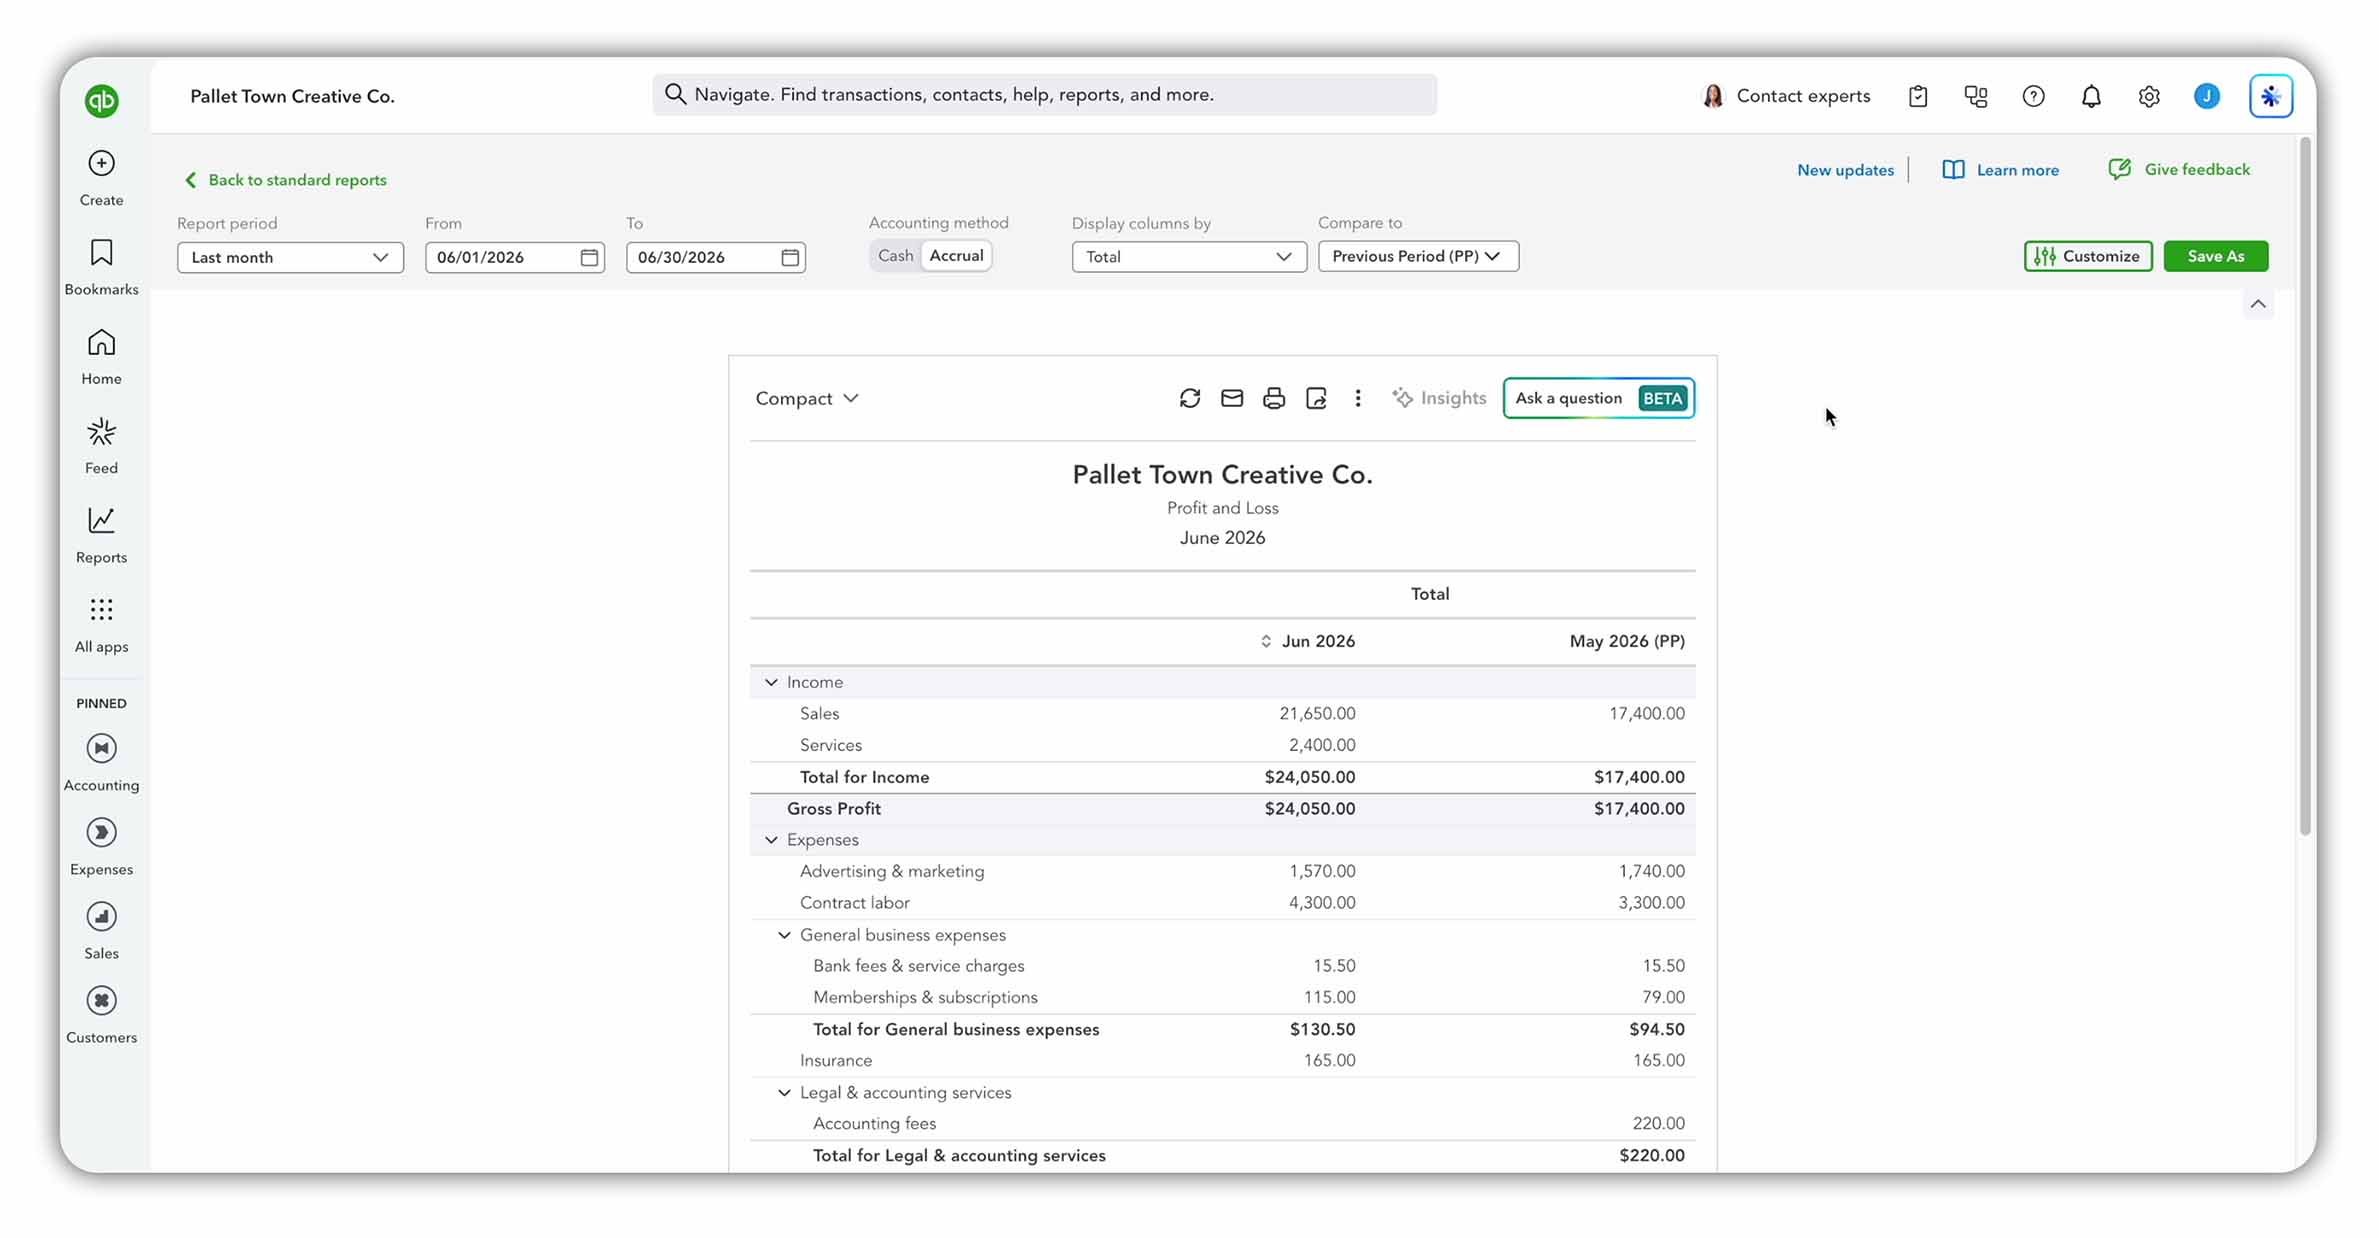
A Profit and Loss report in QuickBooks Online summarizing revenue, expenses and profit for June, with comparison figures from the previous month.
The Profit and Loss (also called the Income Statement) summarizes your revenue, expenses and profit over a selected period of time.
You can customize the reporting period, choose between cash and accrual accounting, and compare the results with a previous period to identify changes in performance.
Balance Sheet
The Balance Sheet provides a snapshot of your business’s financial position on a particular date. It shows:
Assets: What the business owns or is owed
Liabilities: What the business owes to external parties
Equity: The owner’s remaining interest in the business
Total Assets should always equal Total Liabilities plus Equity.
Accounts Receivable Aging
The Accounts Receivable Aging Summary shows which customers owe you money and how long each balance has been outstanding. This helps you identify overdue invoices and prioritize customer follow-ups.
Statement of Cash Flows
The Statement of Cash Flows explains how cash moved into and out of the business during the period.
Under Accrual Accounting, profit and cash flow can differ. For example, an unpaid customer invoice may increase revenue and profit before any cash has actually been received.
QuickBooks reports can be customized, printed or exported whenever you need to analyze performance, share information or prepare your accounts. These reports are only as reliable as the bookkeeping behind them, which is why completing the previous six steps matters.
Final Thoughts
Good bookkeeping in QuickBooks Online involves more than importing transactions. You need to record sales and expenses correctly, reconcile your accounts, review anything unusual and use your financial reports to understand how the business is performing.
QuickBooks can automate much of this work and highlight potential issues, but your review and judgment still matter. Follow this seven-step workflow and you’ll have cleaner records and financial reports you can trust.
Ready to try QuickBooks Online?
Compare the latest plans and introductory offers here:
About the Author
James Hearle is a qualified accountant and the creator of Accounting Stuff, an educational YouTube Channel with over one million subscribers. Drawing on his professional accounting experience, he creates practical videos, guides and learning resources that help students, bookkeepers and business owners understand accounting and apply it with confidence.