
How to Create and Send Invoices in QuickBooks Online
Last updated: August 2026
A well-prepared invoice should make it easy for your customer to understand what they’re being charged for, how much they owe, when payment is due and how they can pay. Missing or unclear information can lead to questions, delays and more time spent following up.
QuickBooks Online brings the entire invoicing process into one place. You can create a professional invoice, email it to your customer, monitor its status, send payment reminders and record the payment without losing track of what’s outstanding.
If you’re completely new to the software, start with this guide to what QuickBooks is and how it works.
In this step-by-step guide, you’ll learn how to create, customize and send an invoice in QuickBooks Online before tracking it through to payment. Whether you’re a small-business owner, freelancer or beginner bookkeeper, you’ll see how each stage fits together and what happens in your accounts along the way.
QuickBooks menus and features may vary slightly depending on your country, subscription and whether QuickBooks Payments is enabled.
Disclosure: This post was created in partnership with Intuit and contains affiliate links. If you sign up through one of these links, I may earn a commission at no additional cost to you.
Watch the Invoice Process from Start to Finish
Want to see exactly where each option appears in QuickBooks Online? In the video below, I create an invoice for a fictional landscaping company, customize its design, add payment instructions and email it to the customer. You’ll also see how to monitor the invoice, send a reminder and record the payment once it arrives.
James demonstrates the complete invoicing process in QuickBooks Online, from creating an invoice for Sunflora Landscaping Services to tracking it and recording the customer’s payment.
The QuickBooks Invoicing Process in Seven Steps
An invoice moves through several stages between being created and being fully paid. Here’s the complete workflow we’ll follow in this guide:
Understand the invoice: Learn what an invoice includes and when to use one.
Create the invoice: Add the customer, dates, payment terms, products and services.
Customize its appearance: Choose which details are displayed and adjust the design to match your brand.
Add payment options: Enable online payments or provide instructions for paying another way.
Preview and send it: Check what the customer will receive before emailing the invoice.
Track it and follow up: Monitor the invoice’s status and send a reminder if necessary.
Record the payment: Apply the money received and clear the outstanding balance.
We’ll use one example throughout the guide so you can see how the invoice progresses through every stage.
Get 50% off QuickBooks Online for 3 months
Follow along in your own QuickBooks Online account and get 50% off your first three months:
Not sure which subscription is right for you? Compare the QuickBooks Online plans before choosing.
Step 1: What Is an Invoice?
An invoice is a document a business sends to a customer to request payment for goods or services it has provided. It tells the customer what they’re being charged for, how much they owe and when the payment needs to be made.
What should an invoice include?
A complete invoice will normally identify:
The business requesting payment
The customer responsible for paying
A unique invoice number
The invoice date and payment due date
The goods or services provided
The quantity, rate and amount for each item
Any applicable taxes or discounts
The total amount owed
Instructions explaining how the customer can pay
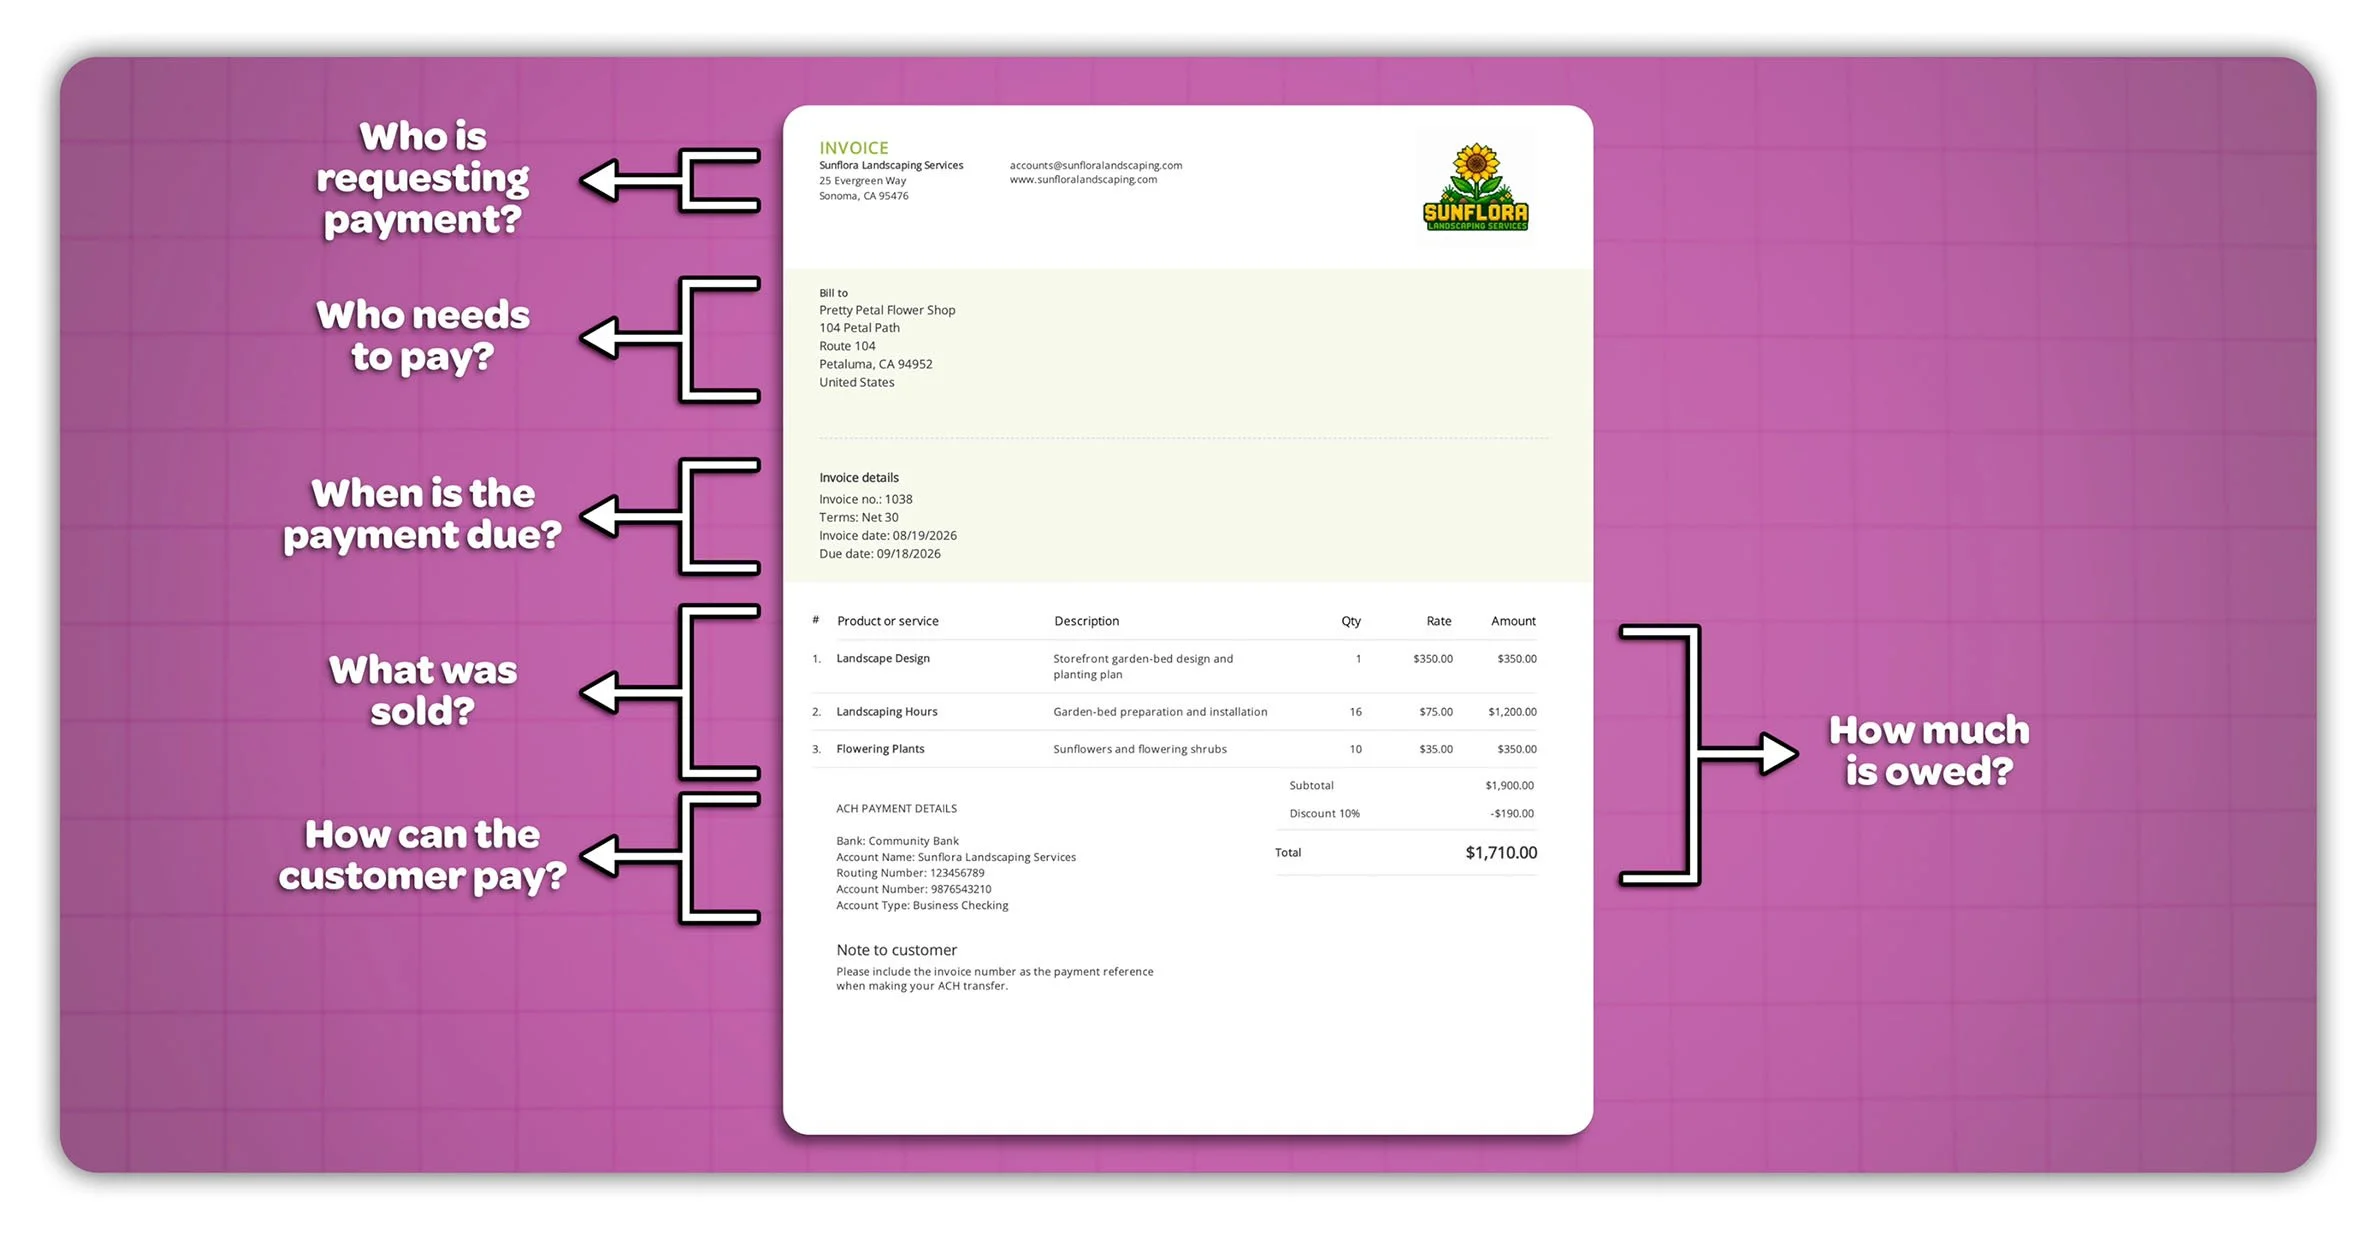
The main sections of a customer invoice, including the business and customer details, invoice number, payment terms, line items, total and payment instructions.
Invoice vs. sales receipt
Invoices and sales receipts both document a sale, but they’re used at different points in the payment process:
Invoice: The customer receives the goods or services now and will pay later
Sales Receipt: The customer pays at the time of the sale
For example, you would usually send an invoice after completing work for a client who has 30 days to pay. If the same client paid immediately, you would normally record the transaction using a sales receipt instead.
If you need to prepare an invoice without accounting software, you can also download my free invoice template for Google Sheets and Excel.
What happens when you create an invoice?
Creating an invoice doesn’t mean that money has been received. It records that the customer now owes your business.
QuickBooks adds the unpaid amount to Accounts Receivable, where it remains until the customer’s payment is recorded and applied. On accrual-basis reports, QuickBooks also recognizes the related income when the invoice is created rather than when the cash arrives.
When the customer eventually pays, the payment increases cash and reduces Accounts Receivable. It doesn’t record the same income for a second time.
For the example in this guide, Sunflora Landscaping Services has designed and installed a new storefront garden bed for Pretty Petal Flower Shop. The work is complete, but the customer hasn’t paid yet, so Sunflora will create an invoice requesting payment.
Quick Tip: Before creating an invoice, check whether the customer has already paid. Use an invoice when payment is still outstanding and a sales receipt when payment was received at the time of sale. Choosing the wrong form can leave an incorrect balance in Accounts Receivable.
Step 2: Create an Invoice in QuickBooks Online
To create a new invoice, select Create from the navigation bar, then choose Invoice under Customers. QuickBooks will open a blank invoice form where you can enter the customer, payment terms and details of the sale.
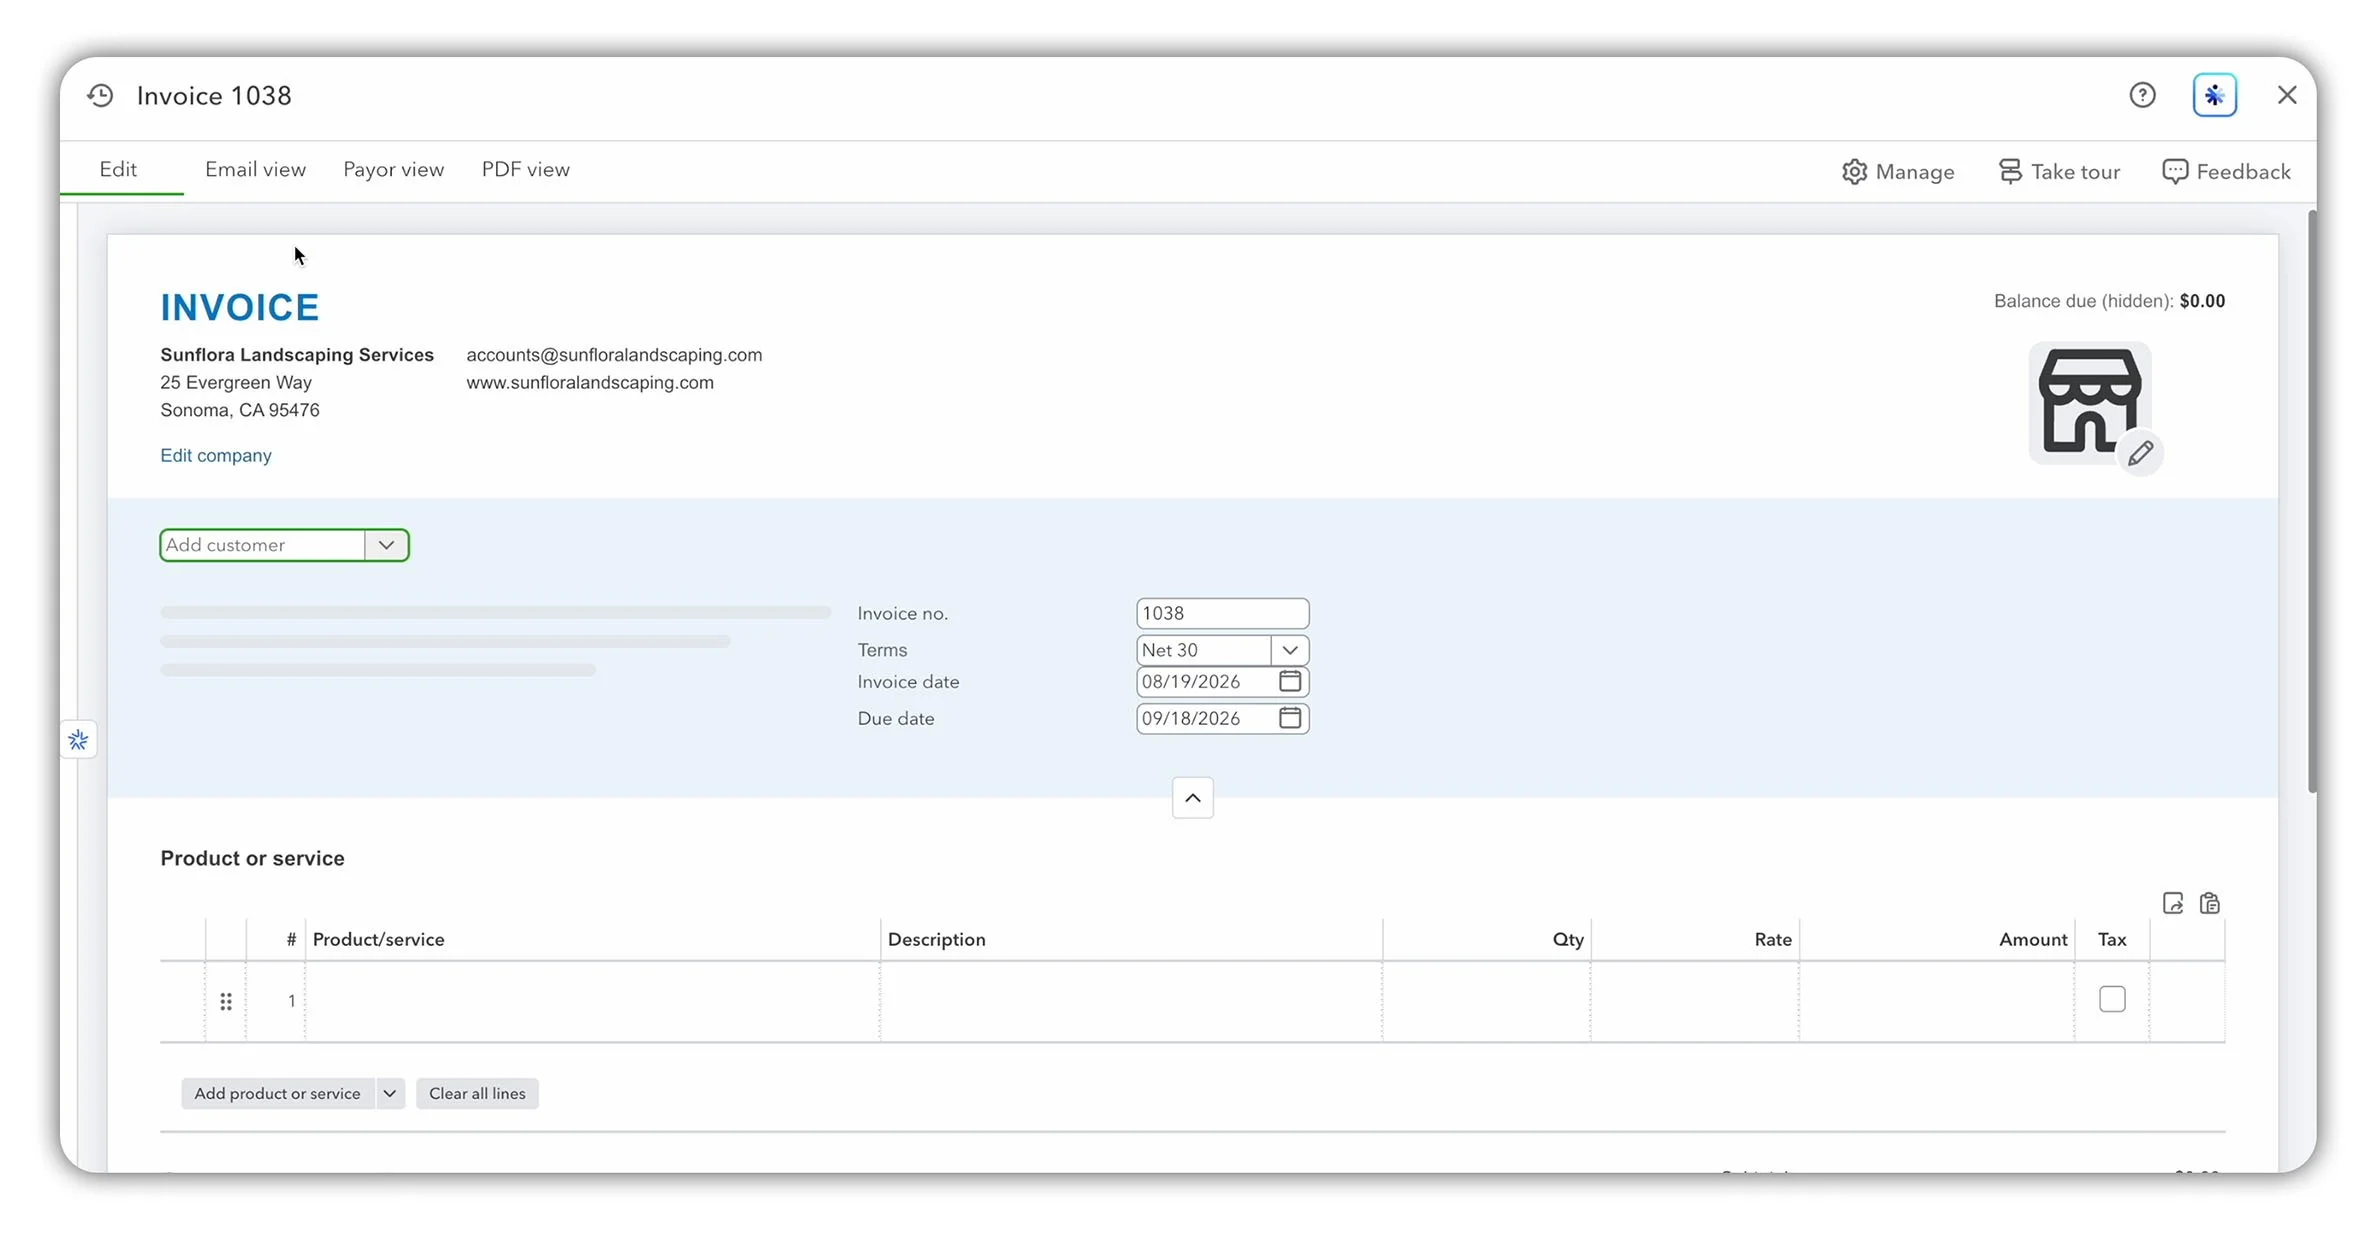
The blank invoice form in QuickBooks Online, where you can add the customer, invoice dates, products and services.
Select or add the customer
Start by choosing the customer you’re billing. If they already exist in QuickBooks, select their name from the dropdown. To set up someone new, choose Add new and enter their contact information.
For this example, Sunflora Landscaping Services is billing Pretty Petal Flower Shop.
QuickBooks automatically fills in information saved against the customer, including their billing address and email address. Check these details before continuing, particularly the email address where the invoice will be sent.
Review the invoice number and dates
QuickBooks normally assigns the next available invoice number automatically. You can change it when necessary, but every invoice should have its own unique number. Our example has been assigned Invoice 1038.
Next, confirm the Invoice date and select the appropriate Payment terms. These terms determine how long the customer has to pay.
We’ll select Net 30, giving Pretty Petal Flower Shop 30 days from the invoice date to make payment. QuickBooks uses those terms to calculate the due date automatically.
Quick Tip: Use a unique invoice number for every invoice. Include that number in any emails or payment instructions so both you and the customer can identify the transaction easily.
Add the products and services
The itemized section explains exactly what the customer is being charged for. For each line, enter:
The product or service
A clear description
The quantity provided
The rate charged
QuickBooks multiplies the quantity by the rate to calculate each line amount.
Here’s what Sunflora Landscaping Services is billing:
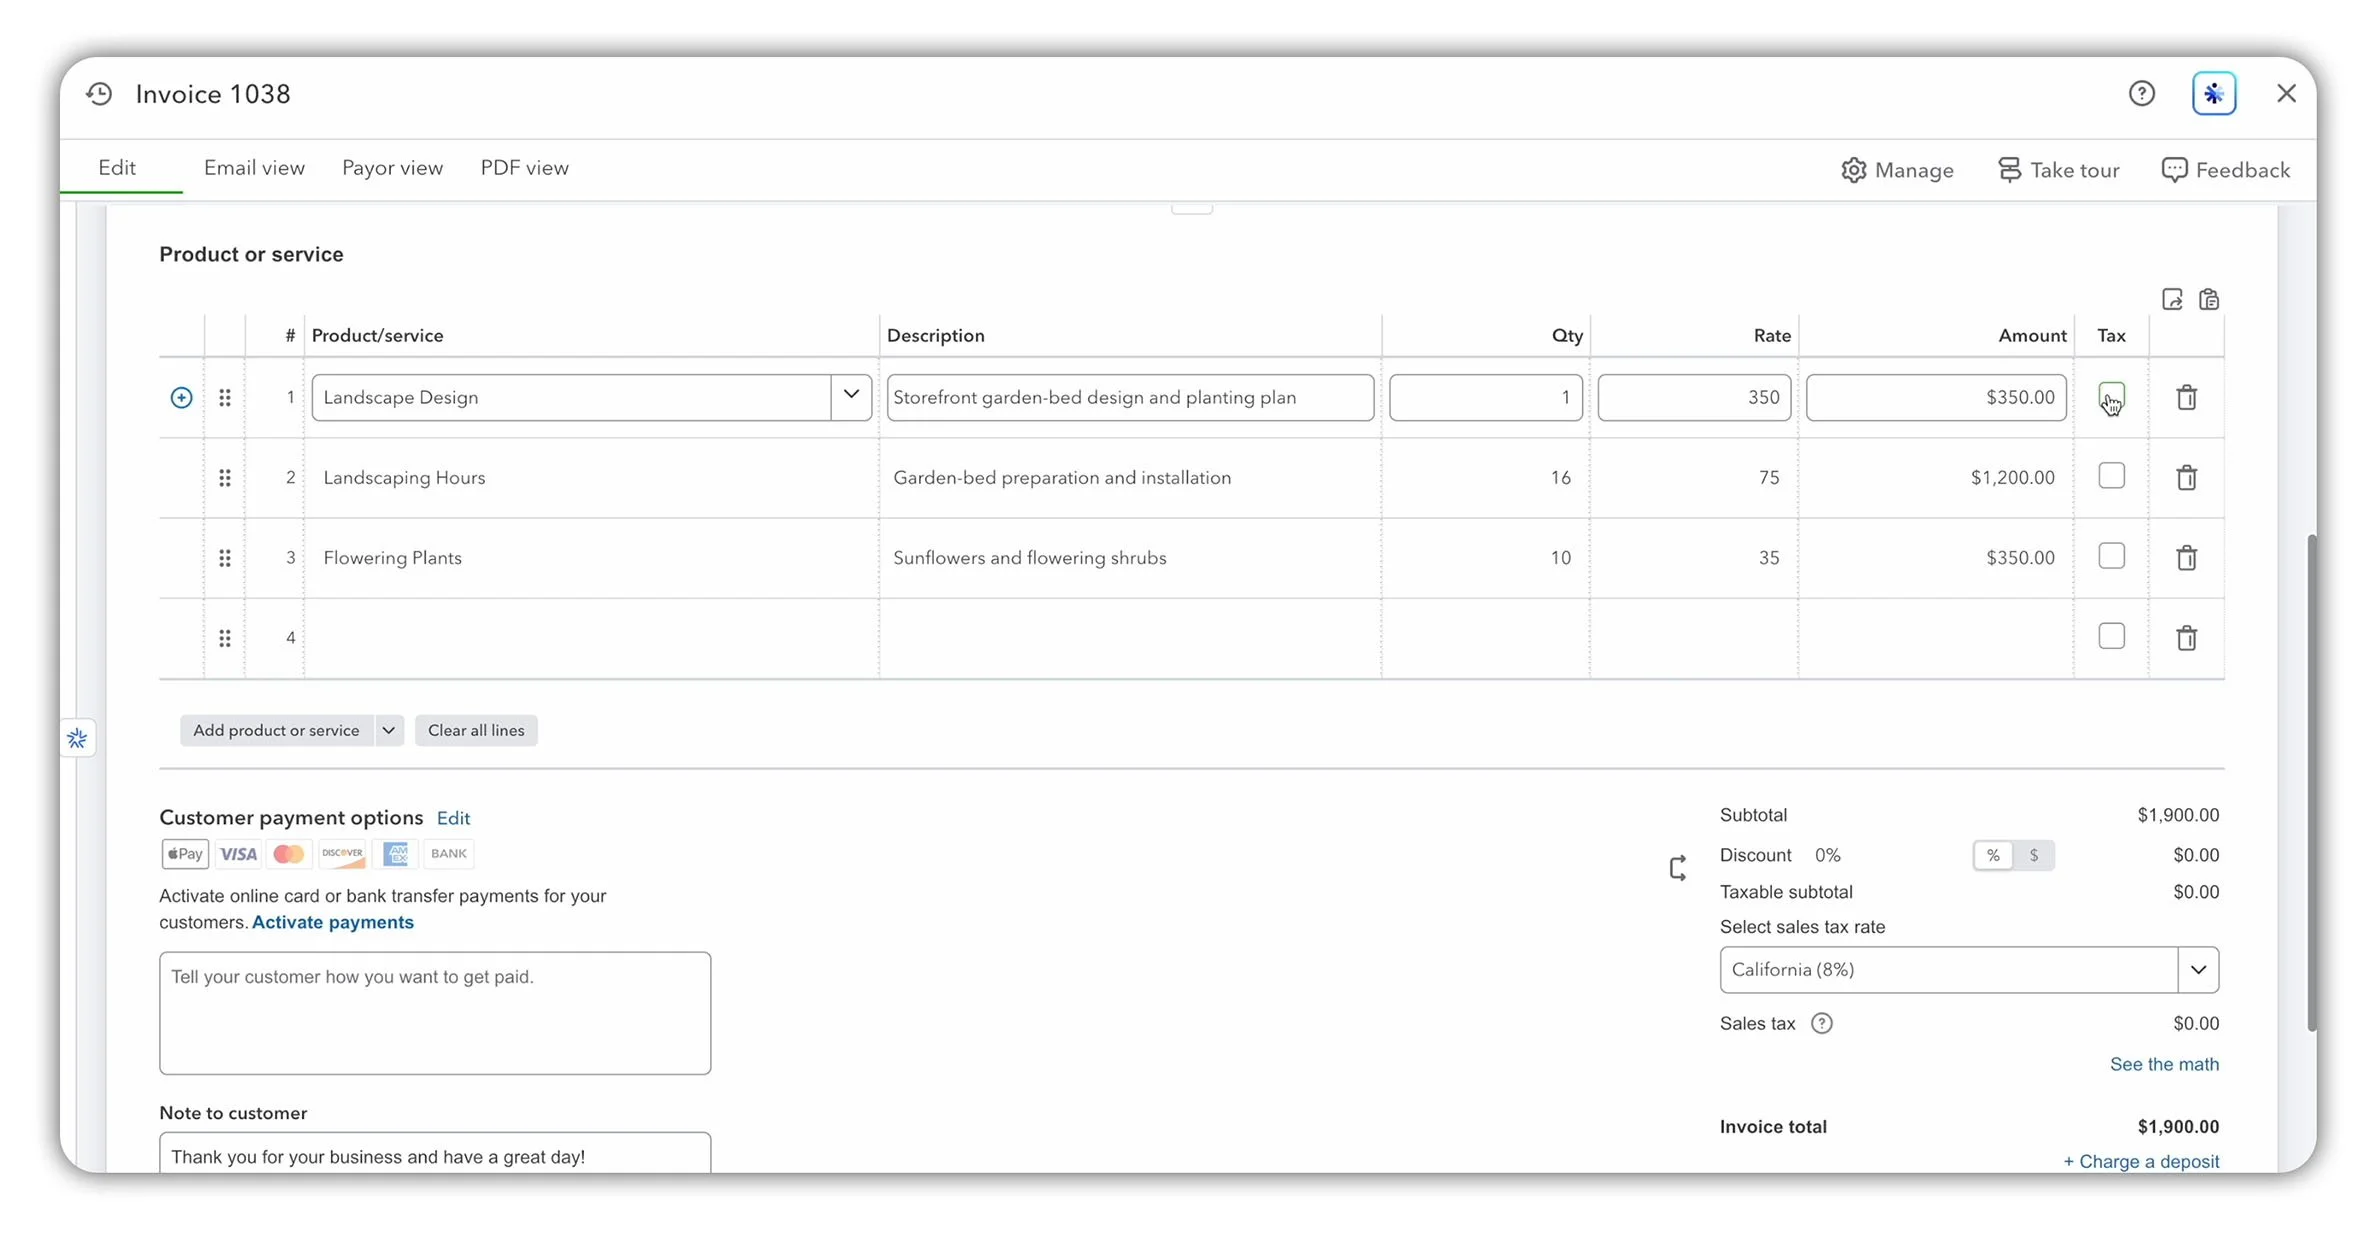
The completed invoice lines for the landscape design, labor and flowering plants supplied to Pretty Petal Flower Shop.
If you’ve already set up these products and services in QuickBooks, their saved descriptions and rates may appear automatically. You can still edit the information on an individual invoice when the work or pricing differs.
Add sales tax and discounts
Check that each product or service has the appropriate tax category. The correct treatment will depend on what you’re selling and the tax rules applying to your business and customer.
For this example, all three items are treated as nontaxable, so QuickBooks doesn’t add sales tax. If you’re uncertain about the correct category, confirm the applicable requirements before sending the invoice.
Sunflora Landscaping Services has also agreed to give the customer a 10% discount. Enter 10 in the Discount field and make sure the percentage option is selected. QuickBooks then updates the total automatically:
Subtotal: $1,900
10% discount: $190
Invoice total: $1,710
With the customer, dates, line items, tax treatment and discount entered, the main invoice details are complete. Next, we’ll adjust how the finished invoice looks.
Step 3: Customize the Invoice
The invoice now contains the correct transaction details, but you can also customize its appearance before sending it. QuickBooks allows you to add your logo, control which fields the customer sees and choose a design that fits your brand.
Add your company logo
Select the pencil icon beside the logo area at the top of the invoice. Choose the image file from your computer, upload it and save your changes.
For this example, we’ll upload the Sunflora Landscaping Services logo. QuickBooks places it in the invoice header, helping the customer recognize who the invoice is from.
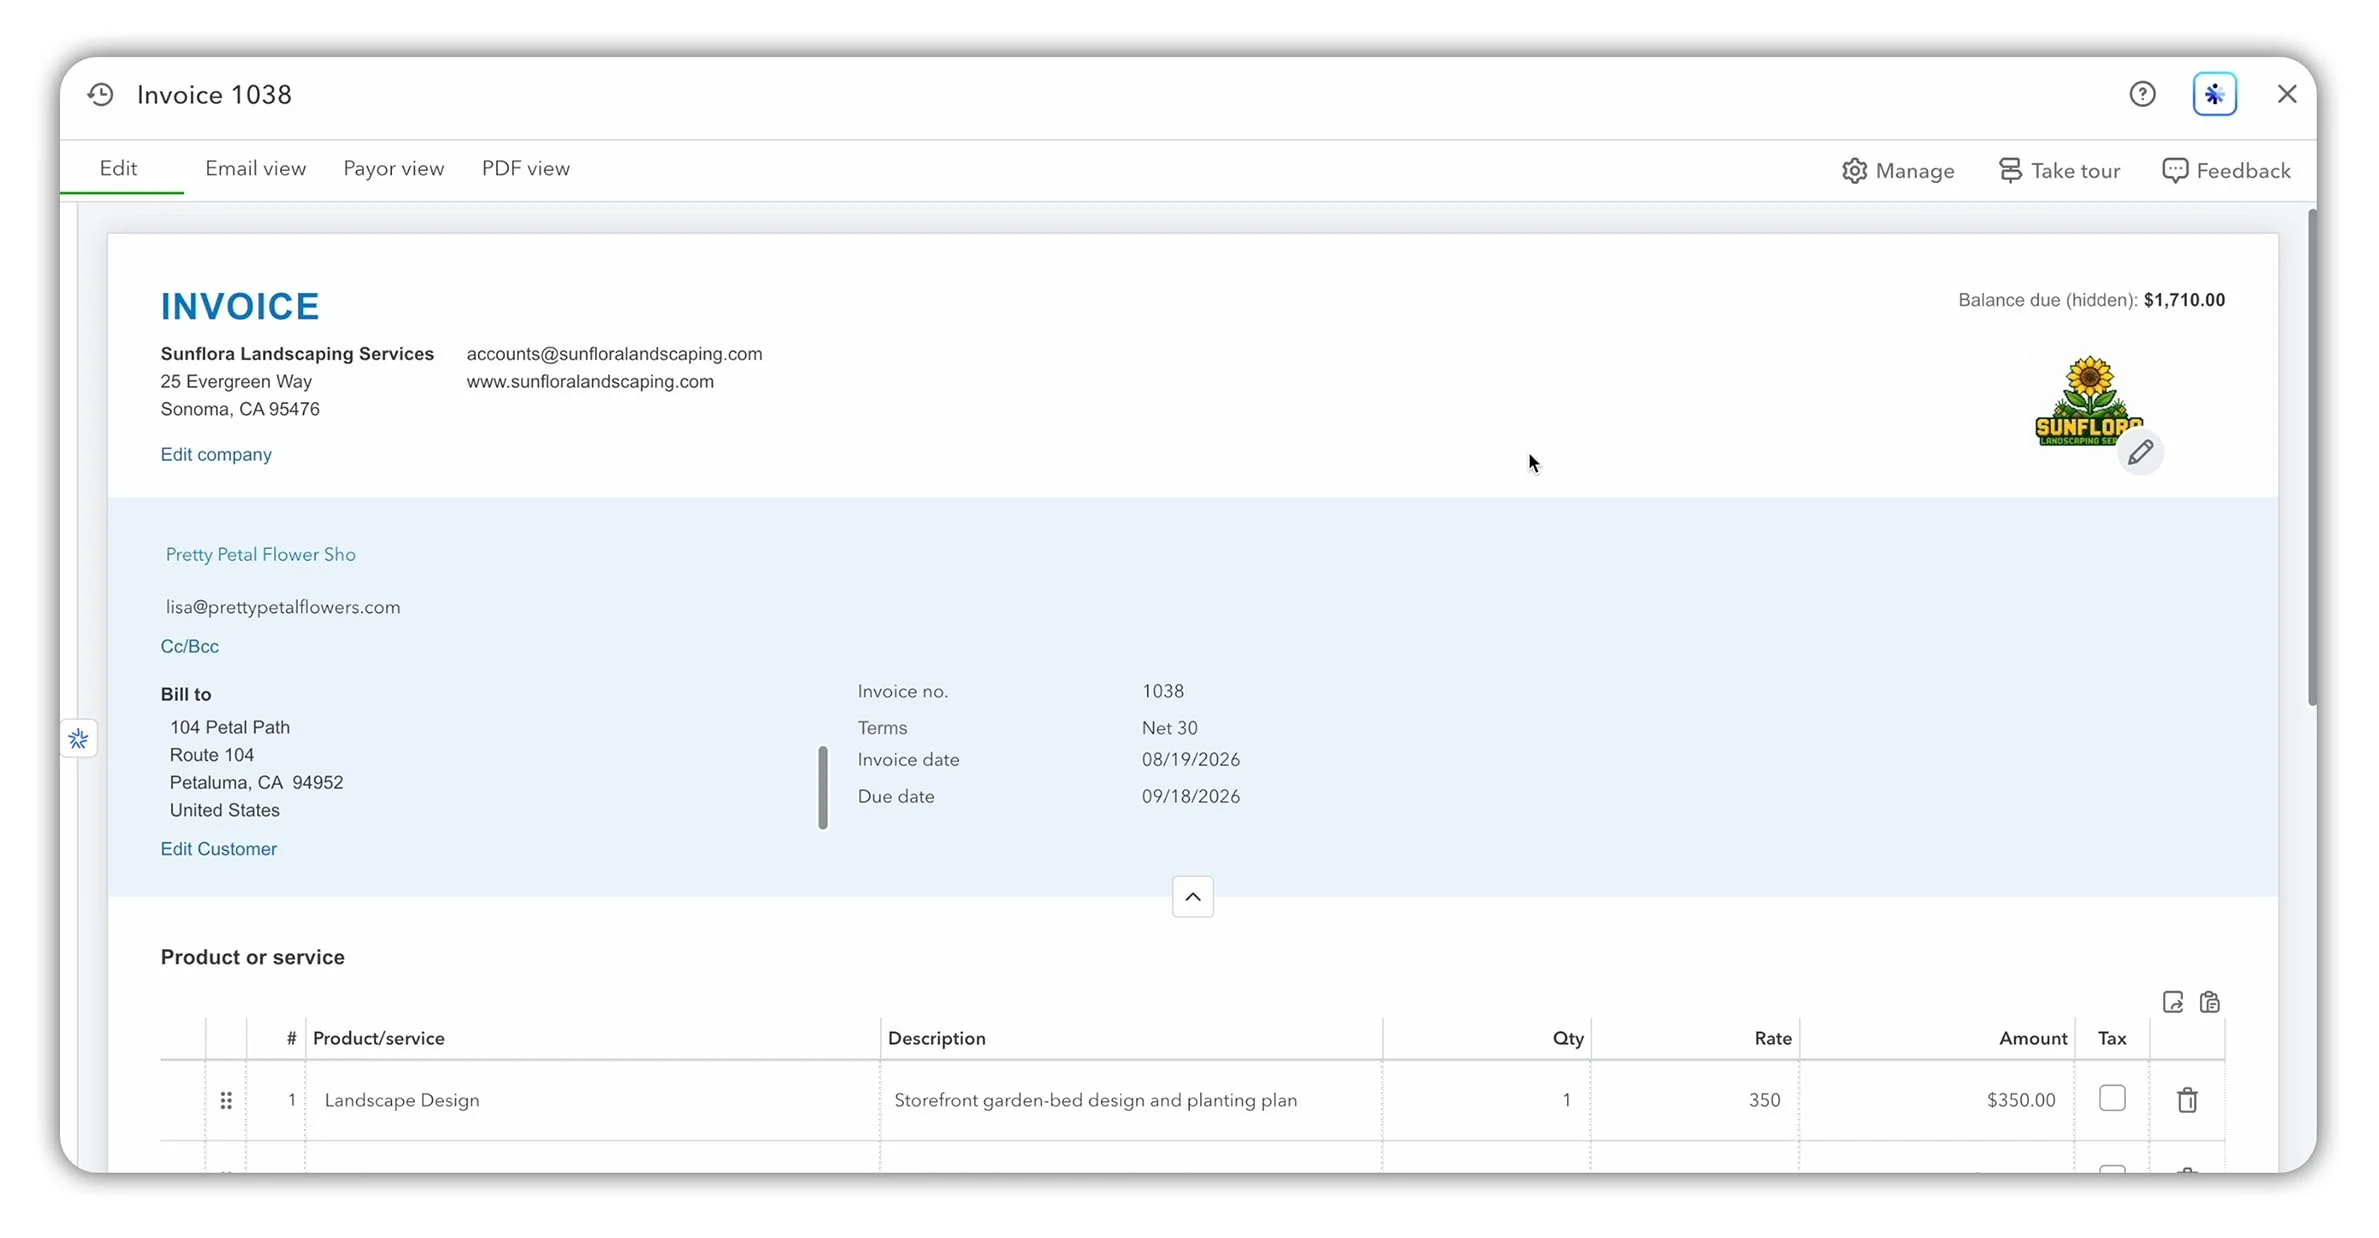
The Sunflora Landscaping Services logo added to the customer-facing invoice header.
Choose which information appears
Select Manage in the top-right corner of the invoice form, then open Customization.
From here, you can control whether the finished invoice displays information such as:
The customer’s shipping address
The invoice number
The invoice and due dates
The payment terms
The customer’s contact information
Keep the fields that help the customer identify and pay the invoice, and hide anything that isn’t relevant to the transaction.
Customize the line-item table
Under Table content, choose which columns appear in the itemized section of the invoice. Depending on your setup, the available columns may include:
Service date
Product or service
SKU
Description
Quantity
Rate
Amount
You can also rename column labels or add custom fields when you need to show additional information.
For the Sunflora invoice, we’ll keep the product or service, description, quantity, rate and amount. The other columns aren’t needed, so leaving them hidden gives the customer a cleaner and easier-to-read breakdown.
Choose the invoice design
Expand Design to change the overall appearance of the invoice.
QuickBooks provides two main templates:
Standard: A more traditional invoice layout
Modern: A cleaner and more contemporary design
Switch between the templates to preview how each one looks. We’ll use the Modern template for the Sunflora invoice.
You can then select an accent color from the available presets or enter a specific hex code that matches your branding. We’ll use a calming green to complement the Sunflora logo.
Other design options include:
A printer-friendly setting that reduces the amount of color used
A font menu for changing the invoice typeface
We’ll select Open Sans to keep the text simple and readable.
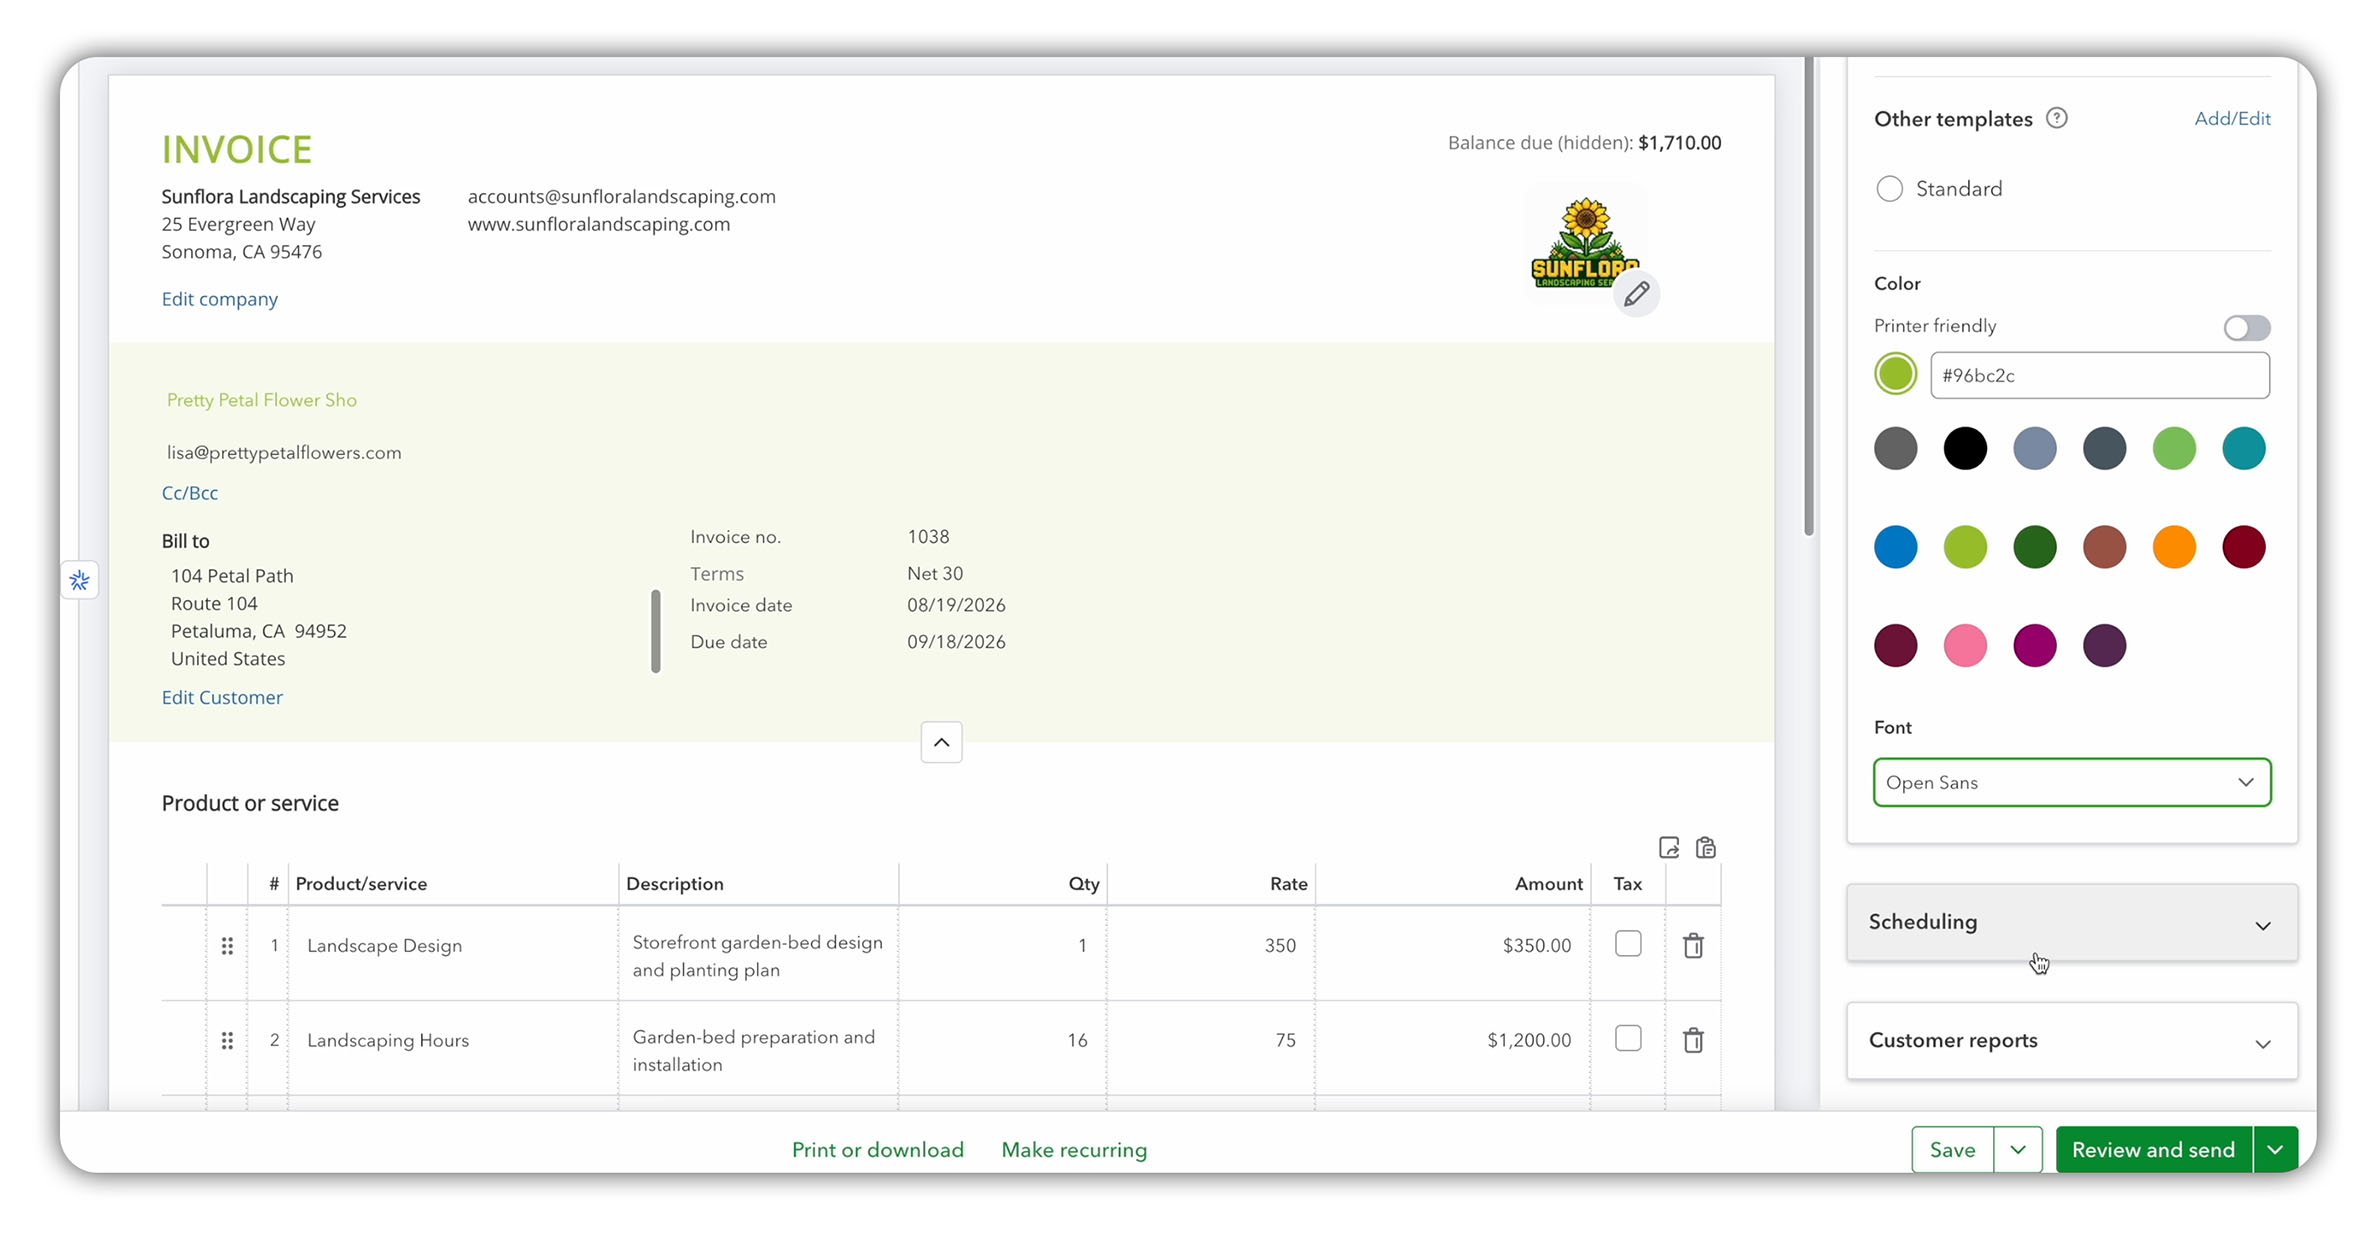
The QuickBooks Customization panel beside the updated Sunflora invoice, showing the Modern template, green accent color and Open Sans font.
Quick Tip: Branding should make your invoice recognizable without making it harder to read. Use a clear font, limit decorative colors and maintain strong contrast between the text and background.
The invoice now matches the Sunflora branding while remaining clean and professional. Next, we’ll give the customer clear ways to pay it.
Step 4: Add Payment Options
An invoice should tell the customer not only what they owe, but also how to pay it. QuickBooks can provide online payment methods or display instructions for payments made outside the platform.
Accept online payments
Open Manage, then select Payment options.
If you’ve activated QuickBooks Payments, you may be able to let customers pay directly from the invoice using methods such as:
ACH bank payment
Major credit and debit cards
Apple Pay
When an online method is enabled, the customer can select the payment option from the invoice and complete the transaction electronically.
QuickBooks Payments isn’t activated in the demo company used for this guide, so we won’t enable online payments for the Sunflora invoice. Available payment methods, processing fees and eligibility can vary by country and account, so check the current options offered for your business.
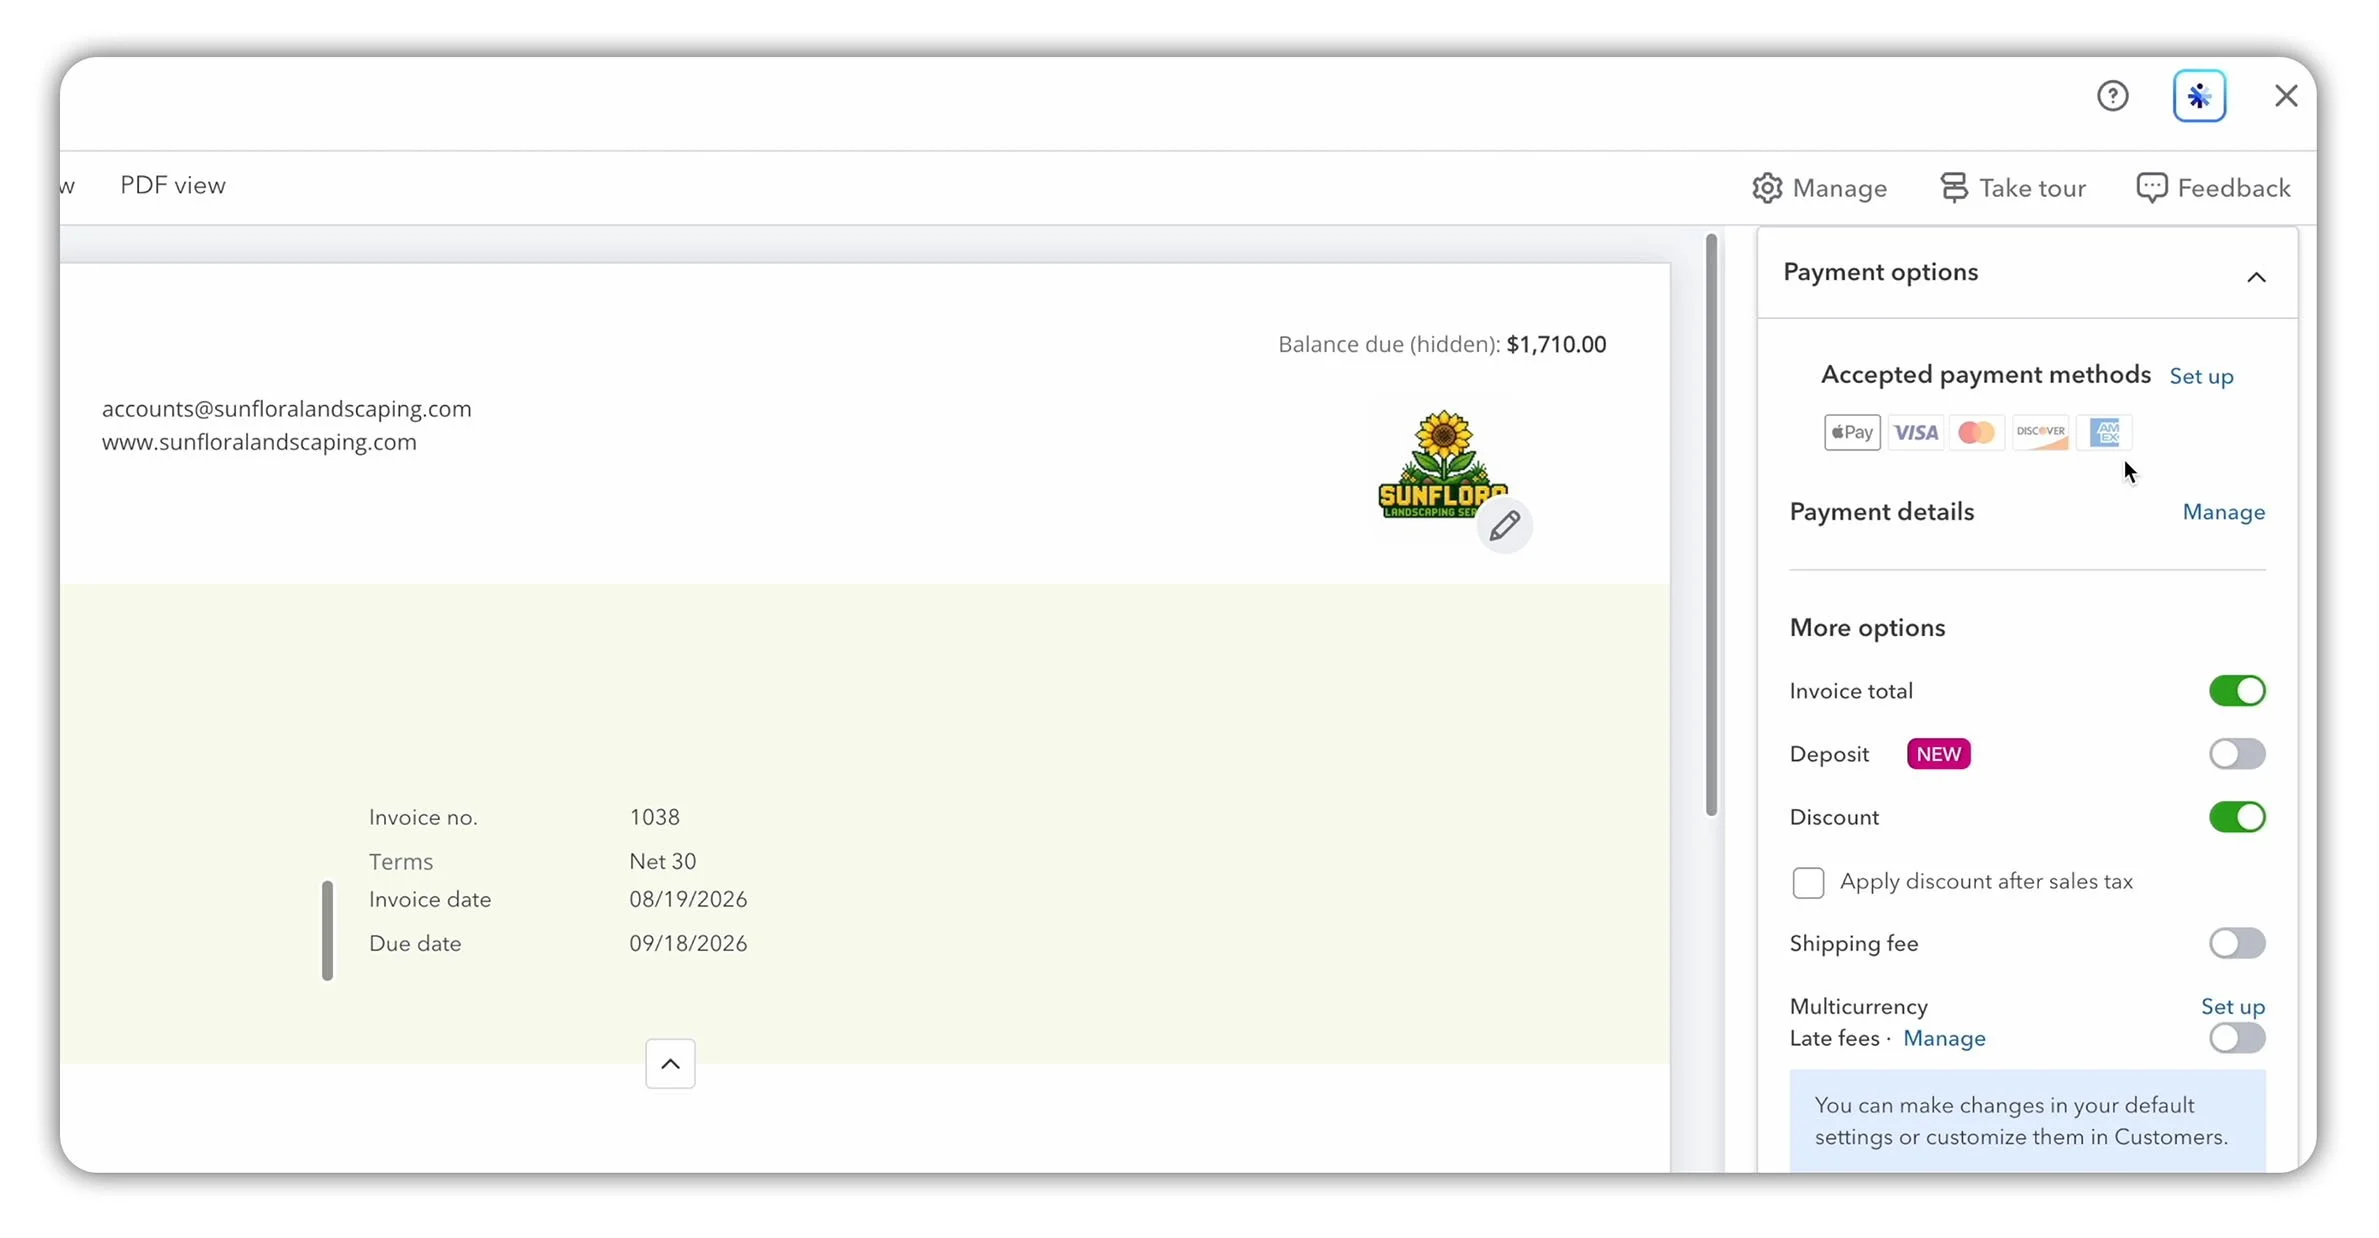
The Payment options panel in QuickBooks Online, where eligible businesses can enable online payment methods for an invoice.
Add manual payment instructions
If the customer will pay outside QuickBooks, you can add the necessary instructions to the Payment details box.
For a manual ACH bank transfer, these details may include:
Bank name
Account name
Routing number
Account number
Account type
Sunflora Landscaping Services will use this section to provide the banking details Pretty Petal Flower Shop needs to make the transfer. The instructions will appear on the customer-facing invoice.
We’ll also ask the customer to include Invoice 1038 as the payment reference. This will make the deposit easier to identify and match to the correct invoice when it reaches the bank account.
Quick Tip: Ask customers to use the invoice number as their payment reference. A clear reference is especially useful when several customers pay similar amounts or one customer has multiple invoices outstanding.
Other available invoice options
The Manage panel also contains settings for other invoice features, including:
Requesting a deposit
Applying a discount
Adding shipping fees
Using multiple currencies
Managing late fees
We don’t need to change these options for the Sunflora invoice, but they may be useful for other transactions.
With the payment instructions added, the customer now knows exactly how to settle the invoice. The next step is to check the finished document and send it.
Step 5: Preview and Send the Invoice
The editing screen doesn’t show the invoice exactly as your customer will experience it. Before sending anything, use the available previews to check the email, online invoice page and PDF document from the customer’s perspective.
Check Email view
Select Email view to preview the message that will arrive in the customer’s inbox.
For the Sunflora invoice, the email displays:
The company logo
The amount due
The accompanying email message
A View details button
The manual ACH instructions
The business’s contact information
Check that the most important details are visible and that the message clearly explains why the customer is receiving the invoice.
Check Payor view
Next, open Payor view. This previews the online page the customer reaches after selecting View details in the email.
The page shows information including:
The outstanding balance
The payment due date
The invoice number
The original invoice amount
Options to view, download or print the invoice
If QuickBooks Payments is enabled, the customer’s available online payment methods will also appear here. Because it isn’t activated in our demo company, the customer is instead directed to contact the business if they need help making payment.
Check PDF view
Finally, select PDF view to inspect the finished invoice document.
Review the PDF carefully and confirm:
The correct customer is named
The invoice number is unique
The payment terms and due date agree
The products and services are accurate
The quantities and rates are correct
Tax has been treated appropriately
The discount has been applied
The invoice total is $1,710
The manual payment instructions are complete
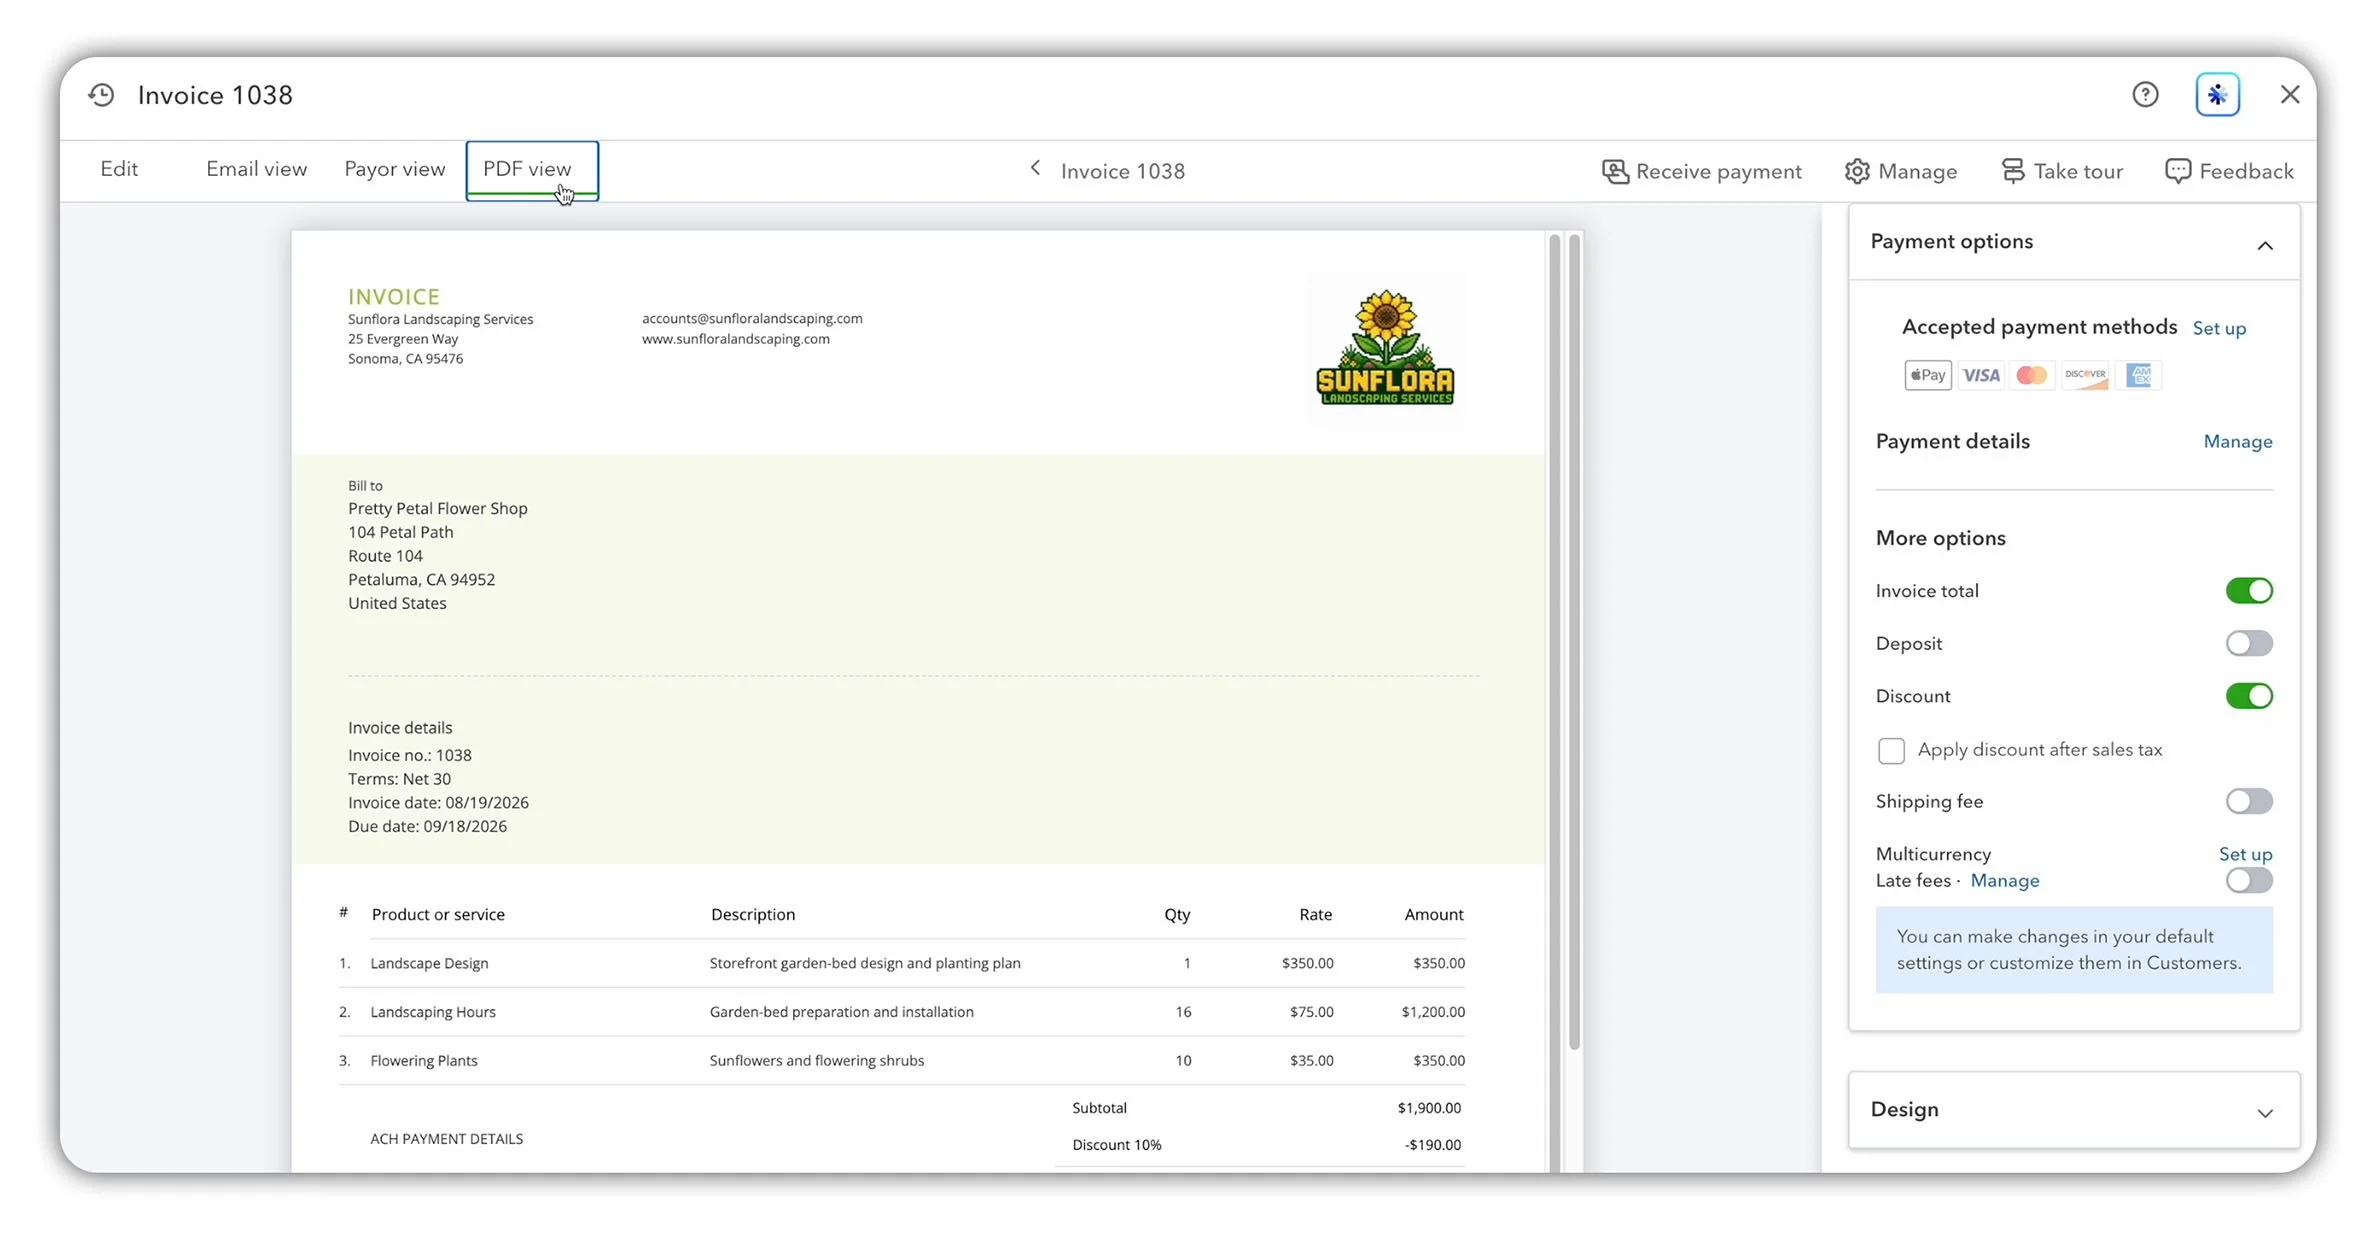
QuickBooks Online PDF view previewing Invoice 1038 for Pretty Petal Flower Shop before it is sent.
Review and send the email
Once the invoice itself is correct, select Review and send.
Then complete the following checks:
Confirm the customer’s email address in the To field.
Add any CC or BCC recipients if required.
Choose whether to send yourself a copy.
Review the email subject line.
Customize the message accompanying the invoice.
Confirm that the PDF copy is attached.
Check the preview one final time.
Select Send invoice.
For this example, we’ll use the subject line:
Invoice 1038 from Sunflora Landscaping Services
You can also review the online delivery settings if you want to change how QuickBooks sends invoices to your customers.
Before sending: Confirm the customer, invoice number, due date, total, recipient’s email address and payment instructions. A final check now is much easier than correcting an invoice after it reaches the customer.
After you select Send invoice, QuickBooks emails it to the customer and records that it has been sent. The invoice is on its way, but you’ll still need to monitor it until the customer pays.
Step 6: Track the Invoice and Send a Reminder
Sending an invoice doesn’t guarantee that it will be paid on time. QuickBooks helps you monitor each invoice as it moves from sent to viewed, overdue and eventually paid.
To find an invoice, go to Sales & Get Paid > Invoices.
Review the invoice status
The summary at the top of the Invoices page organizes customer invoices into several categories, including:
Unpaid invoices that aren’t due yet
Overdue invoices
Paid invoices waiting to be deposited
Payments that have already been deposited
Use the status and date filters to narrow the results when you’re looking for a particular transaction.
Invoice 1038 for Pretty Petal Flower Shop has an outstanding balance of $1,710, is due in 30 days and is currently marked as Sent.
Review the invoice activity
Select an invoice to open its details in the side panel. Here you can review information such as the invoice date, due date, customer and total amount outstanding.
The Invoice activity section records events as the invoice moves through the collection process. Depending on your setup, it may show:
When the invoice was sent
Whether the customer has viewed it
When a payment was recorded
Payment or payout activity
Whether the invoice has been partially paid
If an unpaid invoice passes its due date, QuickBooks marks it as overdue and shows how many days late it is.
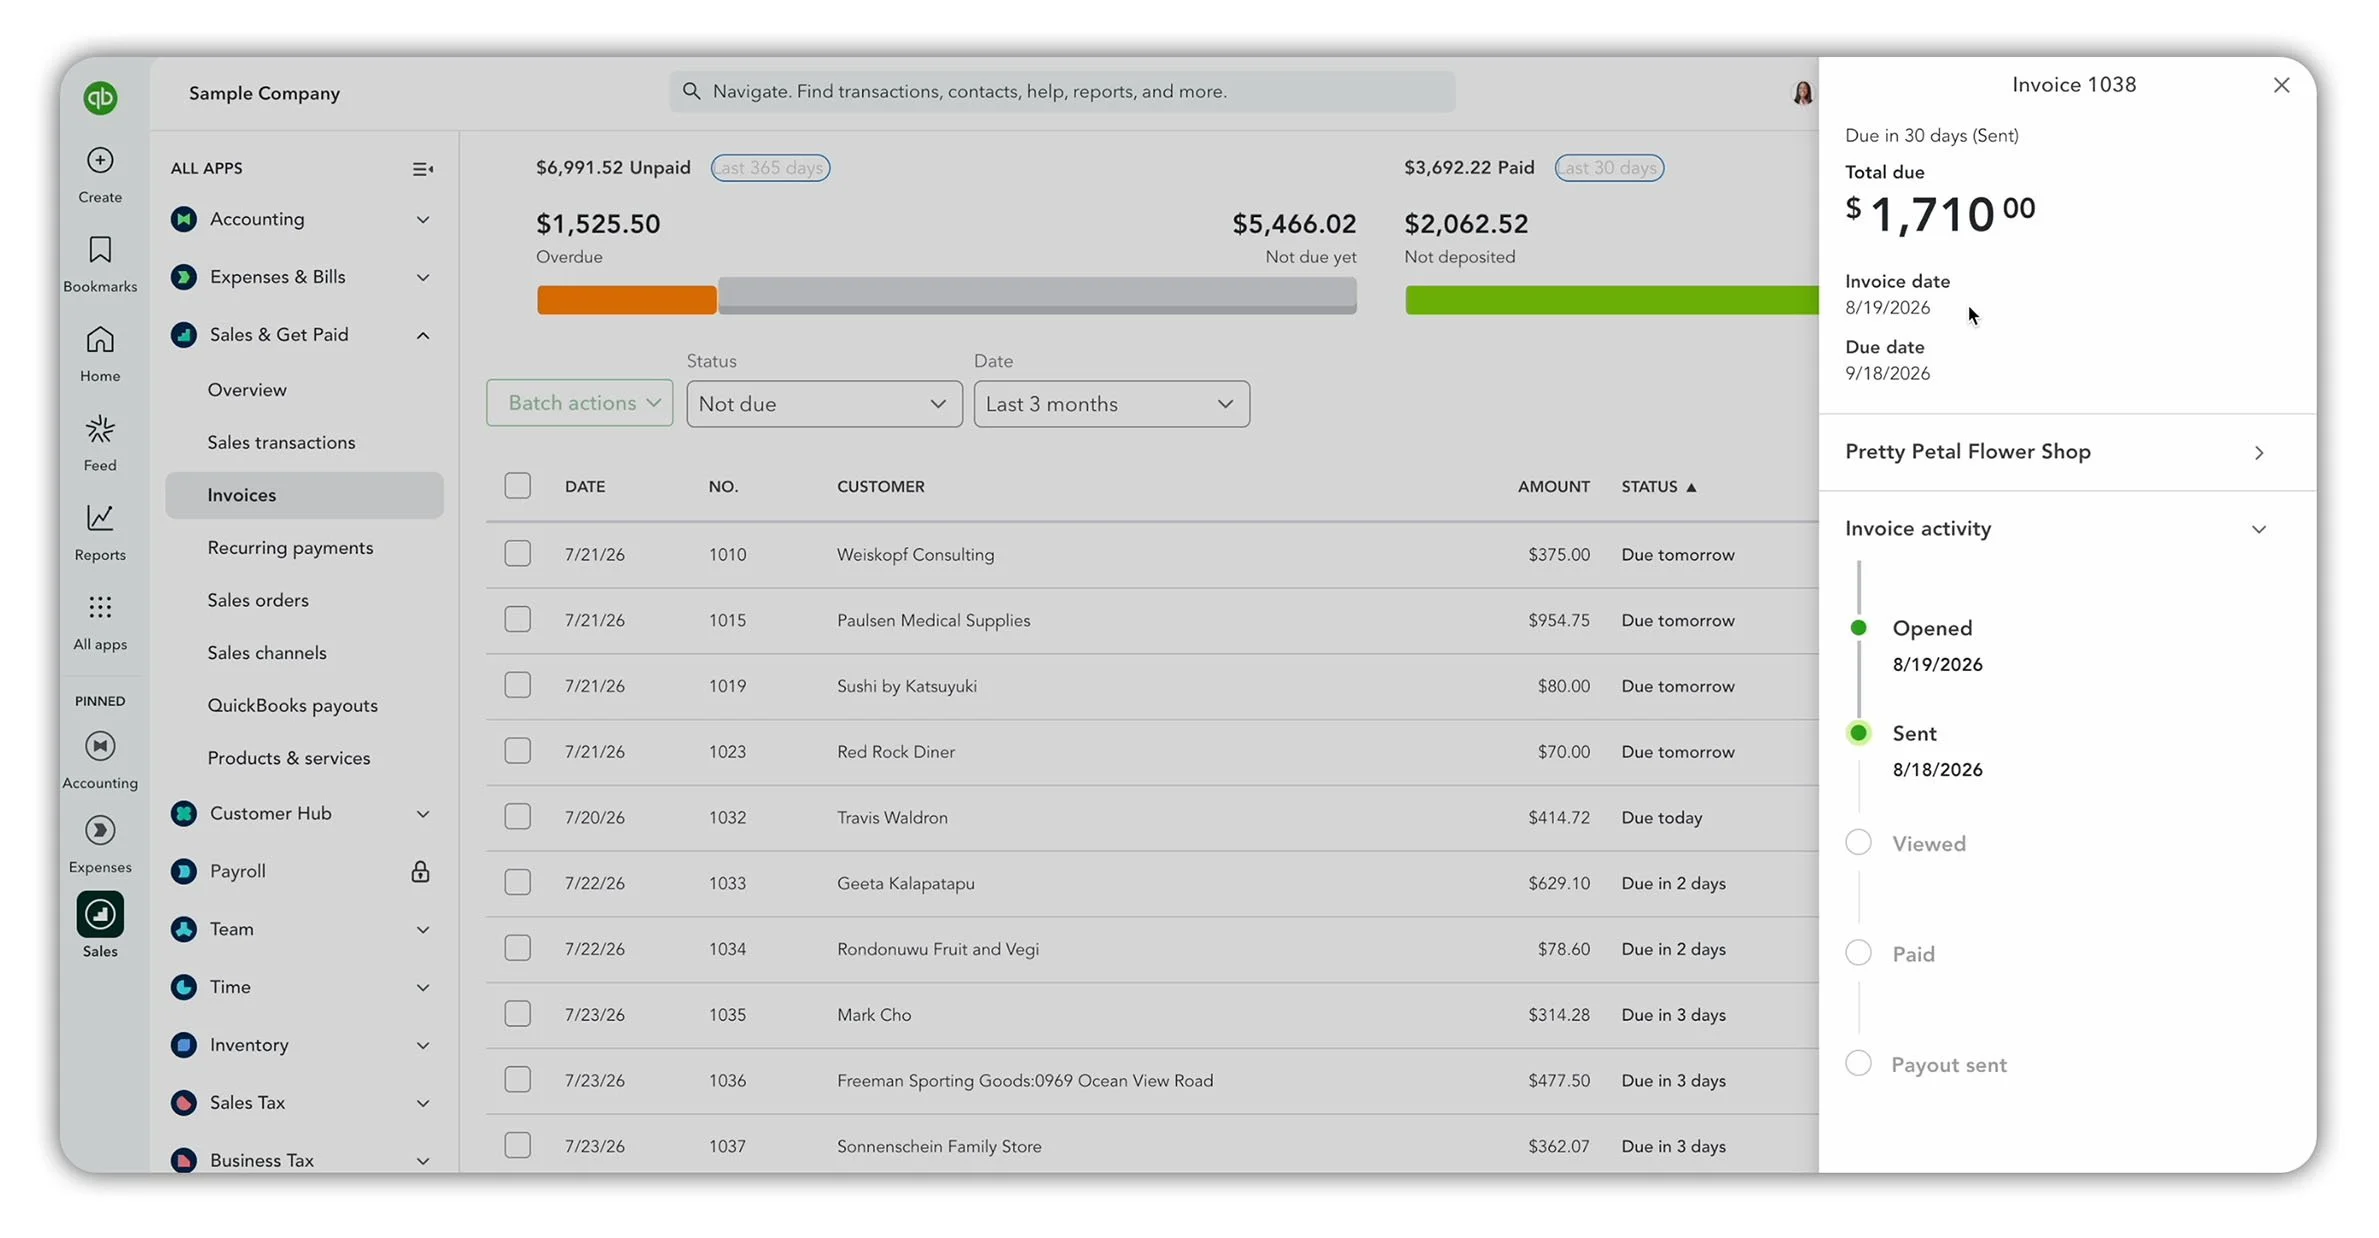
The invoice details panel showing the outstanding balance, due date and activity recorded against Invoice 1038.
Send a payment reminder
If you need to follow up with the customer:
Find the invoice in the list.
Open the dropdown beside Receive payment.
Select Send reminder.
Confirm the sender and recipient.
Review the subject line and invoice details.
Edit the reminder message if necessary.
Select Send reminder.
QuickBooks may be able to draft the message using information from the customer and invoice. You can choose between different tones or ask it to rewrite the wording.
Always review a generated reminder before sending it. Confirm that the customer, invoice number, outstanding balance and due date are correct, then adjust the message to suit your relationship with the customer.
Once the reminder has been sent, QuickBooks records it in the invoice activity.
Quick Tip: A reminder usually makes the most sense close to or after the payment due date. Contacting a customer too early could create confusion unless there’s a specific reason for following up.
Set up automatic reminders
Go to Settings > Account and settings, select Sales, then edit the Reminders section. Turn on Automatic invoice reminders and choose how many days before or after the due date each reminder should be sent.
You can create up to three reminders and customize the subject line and message for each one. Once you’ve finished, select Save, then Done.
Now let’s assume Pretty Petal Flower Shop pays Invoice 1038 in full.
Step 7: Record the Invoice Payment
Pretty Petal Flower Shop has now paid the full $1,710 by manual ACH bank transfer.
Because the transfer was made outside QuickBooks Payments, QuickBooks doesn’t automatically know which invoice has been paid. We need to record the invoice payment and apply it to Invoice 1038.
Go to Sales & Get Paid > Invoices, locate Invoice 1038 and select Receive payment.
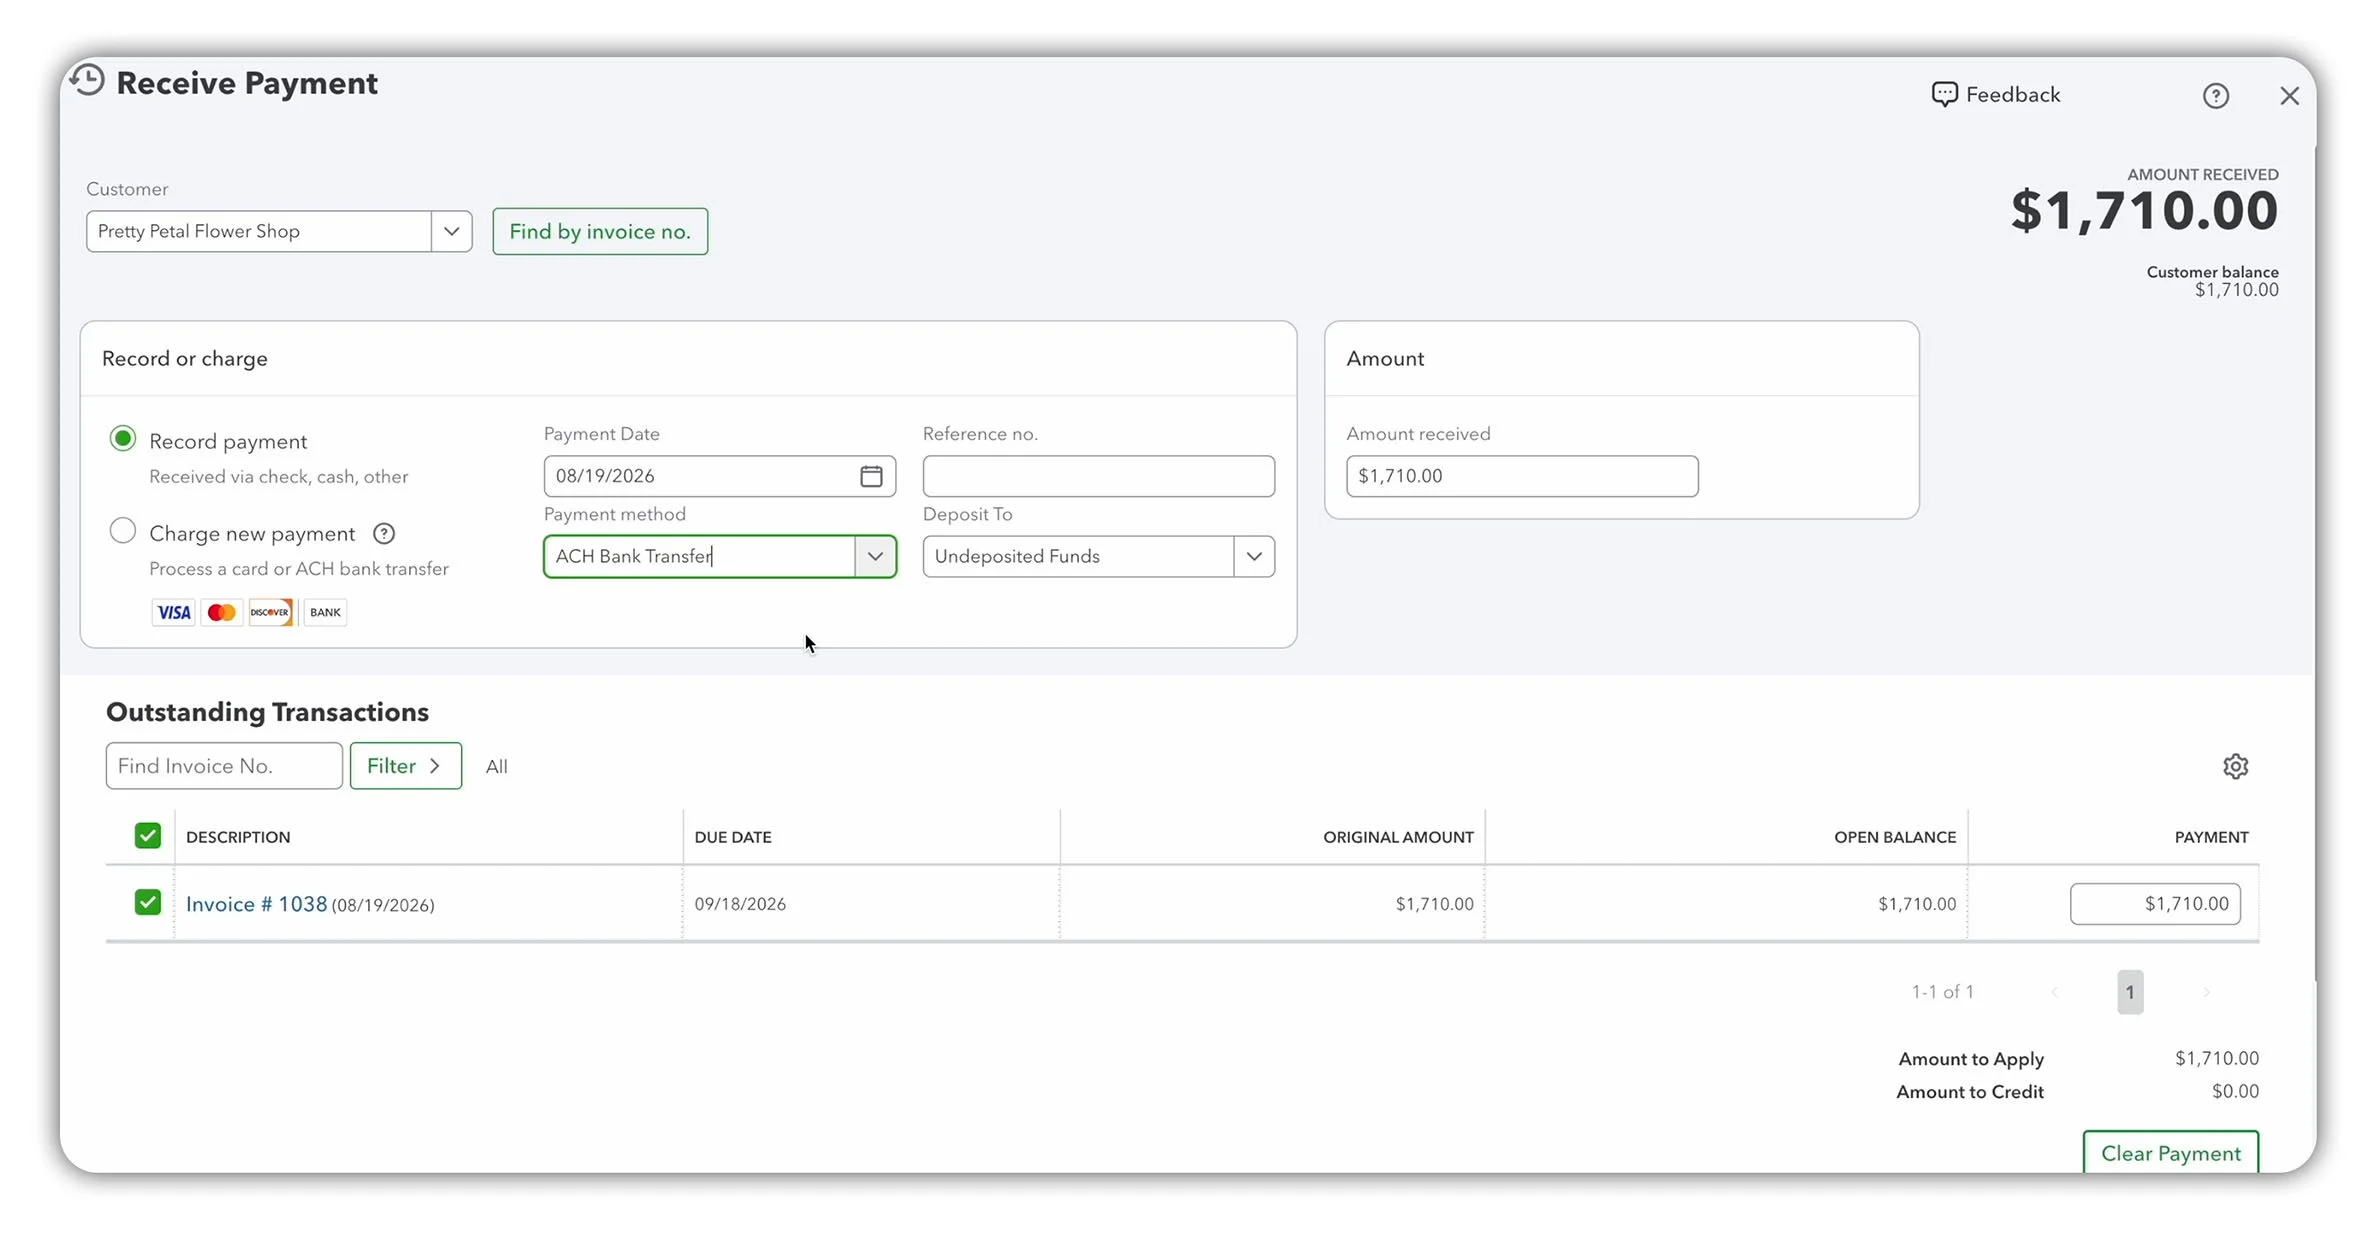
The Receive Payment form in QuickBooks Online, where the customer’s ACH transfer can be applied to Invoice 1038.
Record payment vs. charge new payment
Under Record or charge, QuickBooks displays two options:
Record payment: The customer has already paid by bank transfer, check, cash or another external method
Charge new payment: You want to process a new card or ACH payment through QuickBooks Payments
Pretty Petal Flower Shop has already transferred the money, so we’ll leave Record payment selected. Choosing Charge new payment could attempt to collect another payment from a customer who has already paid.
Enter the payment details
First, confirm that Pretty Petal Flower Shop is selected as the customer. Then enter:
The date the payment was received
ACH bank transfer as the payment method
The bank’s transaction or reference number, if available
The account where the money was received
The amount received: $1,710
For this example, the ACH transfer went directly into Sunflora’s checking account, so we’ll select Checking under Deposit to.
Use Undeposited Funds when you’re holding several customer payments temporarily and intend to combine them into a single bank deposit. This helps the amount recorded in QuickBooks match the combined deposit appearing on the bank statement.
You can also add an internal memo or attach supporting documentation, such as a remittance advice.
Apply the payment to the invoice
Under Outstanding Transactions, QuickBooks displays the customer’s open invoices. To apply the payment correctly:
Select Invoice 1038.
Enter $1,710 in the Payment column.
Confirm that Amount to Apply is $1,710.
Confirm that Amount to Credit is zero.
Select Record and close.
An Amount to Credit of zero confirms that the full payment has been applied to the invoice, with no excess being held as a customer credit.
The dropdown also provides two alternatives:
Record and new: Save the payment and open another blank payment form.
Record and send: Save the payment and email a receipt to the customer.
After the payment is recorded, QuickBooks reduces the invoice balance to zero and changes its status to Paid.
What if the customer only pays part of the invoice?
If the customer makes a partial payment, enter only the amount actually received and apply it to the invoice.
QuickBooks will reduce the outstanding balance by that amount and mark the invoice as Partially paid. The remaining balance will continue to appear in Accounts Receivable until another payment is applied.
What happens in the accounts?
Recording the payment completes the accounting cycle for this invoice:
The checking account balance increases by $1,710.
Accounts Receivable decreases by $1,710.
The invoice balance falls to zero.
Revenue isn’t recorded again because it was already recognized when the invoice was created.
Quick Tip: If the ACH deposit later appears in your connected bank feed, match it to this recorded payment. Don’t add it as a new sale, or the transaction may be counted twice.
If the customer pays through QuickBooks Payments, much of the recording and matching process may be handled automatically. For this manual transfer, however, recording the payment ensures that the customer’s balance and your Accounts Receivable records are both up to date.
Final Thoughts
QuickBooks Online brings the entire invoicing process together—from preparing and sending the invoice to following up and recording the payment. The important thing is to check each stage carefully so your customer receives accurate information and your Accounts Receivable balance stays up to date.
To see how invoicing fits into the wider bookkeeping cycle, read my complete guide to bookkeeping in QuickBooks Online.
Ready to try QuickBooks Online?
Compare the latest plans and introductory offers here:
About the Author
James Hearle is a qualified accountant and the creator of Accounting Stuff, an educational YouTube Channel with over one million subscribers. Drawing on his professional accounting experience, he creates practical videos, guides and learning resources that help students, bookkeepers and business owners understand accounting and apply it with confidence.